LXD: Running Wireguard on a Virtual OpenWrt Router

|
by Craig Miller
In a previous presentation, I have shown how to run OpenWrt inside a LXD container, and in another presentation, how to run Wireguard on OpenWrt to create an IPv6 VPN.
Now it is time to tie it all together, and host Wireguard on a Virtual OpenWrt Router (running inside a LXD container). Why, you may ask? Because it uses fewer real routers, and because it is cool to use Linux Containers.
The IPv6 VPN
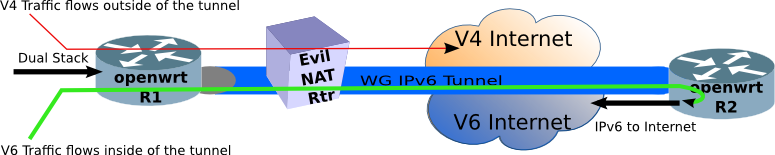
Remember the point is to create an oasis of IPv6 in the deserts of NAT-Land. For the past 20+ years, NAT has become the staple of IPv4 networks. Go anywhere, Starbucks, the airport, or even the library, and you will find yourself on a NAT-ed RFC 1918 network. But how does one tunnel IPv6 through NAT? Wireguard.
In order to accomplish this, we create a split-tunnel VPN, with the IPv4 traffic going directly to the IPv4 internet, and the IPv6 traffic going into the tunnel, where it is terminated on a Virtual Router (VR), and then forwarded to the IPv6 Internet.
Don't have IPv6 at your home (yet), there are commercial IPv6 VPN (using Wireguard) providers such as IPv6Hosting.com.
Routers, real and virtual
|
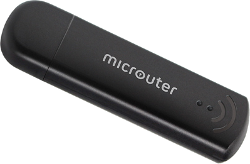
For R1, I am using a real GL.iNET USB150 micro-router, about the size of a thumb drive. It is the smallest commercially available router which runs OpenWrt.
For R2, I am running OpenWrt in a LXD Linux Container on a Raspberry Pi 3b. The Pi is running Ubuntu 18.04.1 LTS in order to support LXD Containers (unfortunately, Raspbian kernel doesn't support LXD).
Follow the instructions on how to create the OpenWrt Virtual Router from the presentation Linux Containers with OpenWrt.
As a refresher, the VR has to run as a privileged Linux Container, since some /dev nodes are not created until boot time.
lxc init local:openwrt_armhf router
lxc config set router security.privileged true
Once the virtual networks are created, exterior (br0) and interior bridges (lxdbr0) and the twointf LXD profile created, the virtual router boot must be completed by running the init.sh script (available on github)
lxc exec router sh /root/init.sh
Installing Wireguard
Installing Wireguard on the Micro-Router is just as described in Wireguard on OpenWrt article. Public and Private keys will have to be generated, with the public key from the MicroRouter copied to the VR, and vise versa.
Wireguard on the OpenWrt VR
Installing Wireguard on the VR is a little different, in that Linux Containers share the Linux Kernel of the host. So just installing Wireguard on the VR will not install the kernel module required.
Installing Wireguard on the Pi (host)
Therefore, wireguard must also be installed on the LXD host (the Raspberry Pi). Unfortunately, wireguard is not in the ubuntu repository, so a PPA (an external repository) must be used.
sudo add-apt-repository ppa:wireguard/wireguard
sudo apt-get update
sudo apt-get install wireguard
As part of the installation, you will see that the kernel module is compiled for the Pi.
In order to ensure the module is loaded, use the following command on the host:
sudo modprobe wireguard
Now install on the VR like it was a real router
Now back to the VR, install Wireguard, as you would a real router, which will install the user-space utilities, and luci-app-wireguard (the web interface). Use LuCI System->Software, or the CLI package manager opkg.
Configuring Wireguard on the VR (R2)
Now that Wireguard has been installed, continue with the instructions to configure from Wireguard on OpenWrt. At a high level, the steps are:
- Generate public and private keys using
wgcommand in assh/cli session on the OpenWrt VR - In LuCI, Create a WGNET interface (Network->Interfaces)
- Configure WGNET Interface: Private Key, Listening Port, and link-local address
- Configure WGNET Peer: Public Key (of MicroRouter), Allowed IPs, End point IP and Port. Save & Apply
- in LuCI, Network->Interface->WGNET->Firewall Settings, Set the WGNET interface in the LAN Zone, Save & Apply
- Connect WGNET, Network->Interfaces->WGNET->Connect
- In a
ssh/cli session on the VR, runreconfig.shscript (available from github) - Wait for the Road Warrior router(R1) to connect
Configuring the MicroRouter (R1)
Configure the MicroRouter similarly as the VR, using the private/public keys (generated on the MicroRouter).
In LuCI, Network->Interfaces->WGNET, press connect, and with any luck, Wireguard will connect, and you are halfway there.
Address Planning
As stated in Wireguard on OpenWrt, some thought must be given to address planning. Because there is no NAT in IPv6, there must be enough networks allocated to ensure that the MircoRouter (R1) WLAN has a /64 prefix to hand out to wireless clients.
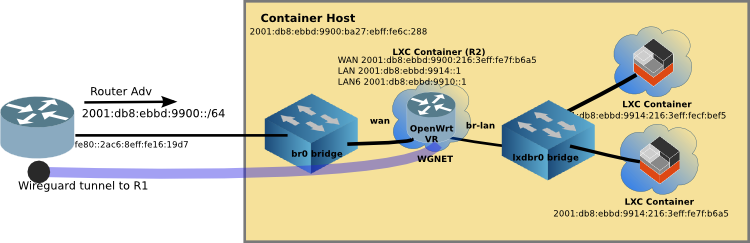
The tan box (in the diagram above) is a Raspberry Pi 3B running LXD (Linux Containers) with a virtual network using linux bridges (brctl). The Ethernet port on the Pi is attached to the linux bridge, br0, at the left of the diagram.
Because my VR also has virtual servers behind it, the LAN bridge (lxdbr0) must have a prefix, the WGNET link will get a prefix, and the MicroRouter WLAN will need a prefix. Therefore, the VR needs at least 3 prefixes. I configured the VR to request a /60 from the upstream router in the interface WAN6 config. And both the LAN and LAN6 (for WGNET) interfaces are configured for a /62.
Configuring DHCPv6-PD Server on the VR
Now that you have an idea of what your address plan will be, you can configure the VR WAN6 to request the /60 (in LuCI Network->Interfaces)
- Request IPv6-prefix of length 60
And the LAN:
- IPv6 assignment length 62
And finally the LAN6 (which is stacked over the WGNET Interface)
- IPv6 assignment length 62
On the MicroRouter (R2)
Create a LAN6 Interface (over the WGNET) as a DHCPv6 Client, and set it to request a /64
- IPv6 assignment length 64
The interfaces on the VR should look something like this (from the ssh/cli session):
~ # ip addr
1: lo: <LOOPBACK,UP,LOWER_UP> mtu 65536 qdisc noqueue state UNKNOWN group default qlen 1000
    link/loopback 00:00:00:00:00:00 brd 00:00:00:00:00:00
    inet 127.0.0.1/8 scope host lo
       valid_lft forever preferred_lft forever
    inet6 ::1/128 scope host
       valid_lft forever preferred_lft forever
2: br-lan: <BROADCAST,MULTICAST,UP,LOWER_UP> mtu 1500 qdisc noqueue state UP group default qlen 1000
    link/ether 00:16:3e:fe:5b:89 brd ff:ff:ff:ff:ff:ff
    inet 192.168.181.1/24 brd 192.168.181.255 scope global br-lan
       valid_lft forever preferred_lft forever
    inet6 2001:db8:ebbd:9914::1/62 scope global noprefixroute
       valid_lft forever preferred_lft forever
    inet6 fe80::216:3eff:fefe:5b89/64 scope link
       valid_lft forever preferred_lft forever
6: WGNET: <POINTOPOINT,NOARP,UP,LOWER_UP> mtu 1420 qdisc noqueue state UNKNOWN group default qlen 1000
    link/none
    inet6 2001:db8:ebbd:9910::1/62 scope global noprefixroute
       valid_lft forever preferred_lft forever
    inet6 fe80::58/64 scope link
       valid_lft forever preferred_lft forever
51: eth1@if52: <BROADCAST,MULTICAST,UP,LOWER_UP> mtu 1500 qdisc noqueue state UP group default qlen 1000
    link/ether 00:16:3e:d1:36:cc brd ff:ff:ff:ff:ff:ff link-netnsid 0
    inet 10.99.99.69/24 brd 10.99.99.255 scope global eth1
       valid_lft forever preferred_lft forever
    inet6 2001:db8:ebbd:9900:216:3eff:fed1:36cc/64 scope global noprefixroute
       valid_lft forever preferred_lft forever
    inet6 2001:db8:ebbd:9900::326/128 scope global noprefixroute
       valid_lft forever preferred_lft forever
    inet6 fe80::216:3eff:fed1:36cc/64 scope link
       valid_lft forever preferred_lft forever
But what if I don't have a MicroRouter?
Of course, you don't need to use a MicroRouter as your road warrior router (R1). It can be any OpenWrt router with Wireguard installed/configured. The MicroRouter is just smallest, and easiest router to pack along on your travels.
And Engage!
Now if everything is working, the WGNET will connect, and the LAN6 interface on the MicroRouter (R1) will make a DHCPv6 request over the Wireguard link to the VR (R2), and will receive a Prefix Delegation for the WLAN.
Then sit back, while you and your friends enjoy the promise of the future in your IPv6 Oasis.
postscript: The MicroRouter is not a very powerful router with only a single core MIPS processor, and one shouldn't expect gigabit speeds with it. During a demo, the router bogged down after eight of my friends connected. We had IPv6, but it was really s-l-o-w. The MicroRouter is small, cute and portable, but it isn't powerful. If you have more than 8 friends, you should look into a more powerful portable router, like the GL.iNET AR 750 or the less portable but faster TP-Link Archer C7 AC1750 Dual Band
*Dr Fun (used with permission)
8 May 2019