Wireguard IPv6 VPN
Bringing the IPv6 Internet to the IPv4-only land of NAT
by Craig Miller
The evil of NAT (Net Address Translation) has become institutionalized. And because NAT munges the network header, it causes all sorts of problems, including preventing simple IPv6 tunneling (6in4).
But go to any Starbucks, McDonald's, the airport or even the Library, and you will find yourself on a NATted network. How to get on the IPv6 Internet when stuck behind NAT? Enter the VPN (Virtual Private Network).
VPN tunneling IPv6
Most people use VPNs make it appear they are in a different location, or are looking for the extra security. But most (99%) VPN providers only support IPv4, and in fact, either disable IPv6, or ask you to do so to prevent IPv6 leakage.
But what if you could use a VPN to transport IPv6 traffic to the IPv6 Internet (now over 25% utilization). I looked at OpenVPN, for this purpose, but found all the moving parts (Certs, pushing routes, lack of IPv6 examples) daunting. If you have a working OpenVPN setup, you may find it easier to tunnel IPv6 through it.
Wireguard, the easy VPN
Wireguard is getting a lot of buzz these days, as it is much easier to setup than OpenVPN. It works similar to ssh keys. Create public/private key pair, for each node in the VPN, tell the each nodes the remote node IPv4 address, and connect! Wireguard is very good at making a complex VPN thing into a simple setup.
But the typical Wireguard VPN only has a roaming laptop at the far end. I wanted to share the IPv6 goodness with my friends, which meant that I wanted to have an entire IPv6 subnet available in IPv4-only NATland.
Using OpenWrt to share IPv6 in NAT-Land
OpenWrt to the rescue. OpenWrt is an open source router software than runs on hundreds of different types of routers. And Wireguard is a package that is prebuilt for each of those routers. There's even a friendly web GUI frontend to configure Wireguard! What's not to like.
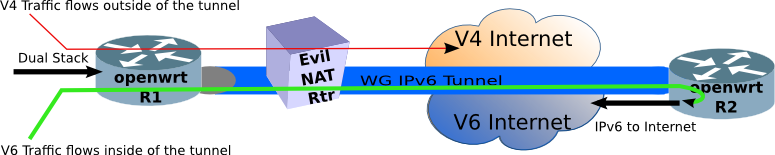
The network (above) shows the highlevel design. Allow IPv4 traffic to follow the usual NAT-Land path to the IPv4 Internet (via the Evil NAT Router). But push the IPv6 traffic through the Wireguard Tunnel, where there is another router which will forward it onto the IPv6 Internet. This is called split tunnel in VPN parlance.
The advantages of this topology are:
- IPv4 traffic follows the usual NATted path, no change there
- End stations (to the left of R1) require no special software configuration to use it
- Rather than just keeping the IPv6 to yourself, you can share the IPv6 goodness with anyone connecting to R1 router
The last point means you can bring IPv6 networking into the unfriendly IPv4 NAT-Land world, and show people there is a better way (like a 4K TV). Training is the obvious application, but there are other applications such as transitional networks, and better security.
Address Planning
Before we get too far, you will need an address plan. Since IPv6 will need a network for each link (almost, we'll use link-local for the point-to-point link), we need a plan so that packets can be routed down to R1 at the far end of the WireGuard VPN from the internet.
Since I am routing the VPN tunneled IPv6 packets through my house, I will need more than a /64 from my ISP. Fortunately, I have a /48. The address plan should look something like this:
- ::/0 The Internet
- 2001:db8:ebbd::/48 My House Network
- 2001:db8:ebbd:9900::/56 my DMZ Network
- 2001:db8:ebbd:9908::/62 the LAN ports of R2, which are unused, but DHCPv6 allocates them automagically
- 2001:db8:ebbd:990a::/64 the LAN ports of R1, which is out in NATland
Assuming you are running a DMZ, and an internal LAN, you are going to need at least 3 /64 networks. Therefore if your ISP provides a /60 you have enough, and if they give you a /56, you have plenty to do other IPv6 projects as well.
Installing Wireguard on OpenWrt
The easiest method is to use the Web GUI to install software on the router. But it can also be done via the CLI, after ssh-ing to the router.
opkg update
opkg install luci-app-wireguard
The luci-app-wireguard is for the web GUI, but it also pulls in the kernel module which does most of the work kmod-wireguard, and wireguard-tools which contains the CLI interface.
After installing wireguard, use the CLI tool wg to create a private/public key pair. This command does both in one easy line
wg genkey | tee privatekey | wg pubkey > publickey
Just like when using ssh private/public keys, the private key is private. It never leaves the system it was created on. Whereas the public key can go anywhere, including publishing it on the internet!
Creating the WGNET interface on the router
This is quite easy using the OpenWrt LuCI Web GUI. Under Network->Interfaces, scroll to the bottom and click on the Add New Interface button.
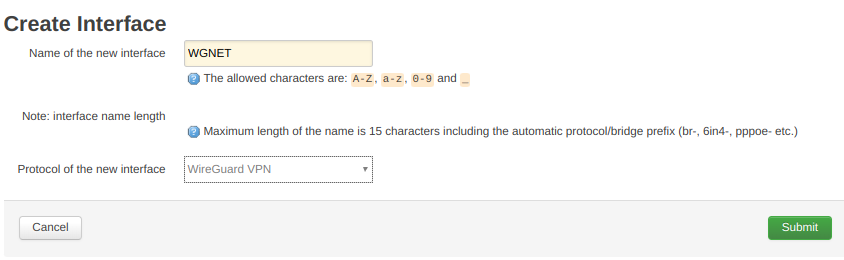
Name the new interface something meaningful, like WGNET, and select WireGuard VPN as the protocol, and click submit.
The next screen is the Interface configuration page of router R2 (see network above).
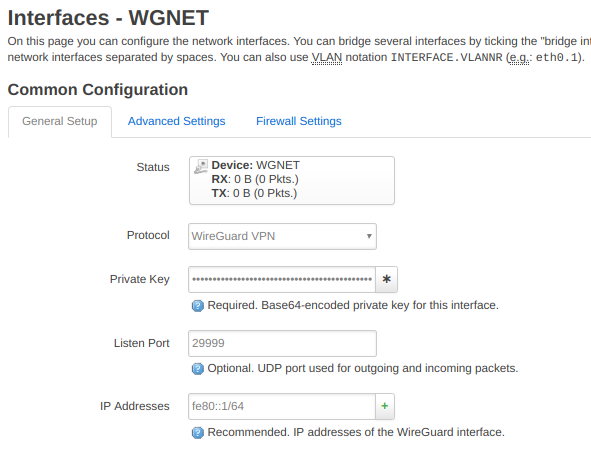
Fill in the blanks. The private key is the private key you created earlier (hint: it is stored in /root/privatekey). Pick a random-ish listening port (I chose 29999). And lastly select an IPv6 address for the interface, I chose fe80::1. I chose to use a link-local for a few reasons;
- Because I can
- It is more IPv6-like to use link-locals on a link
- It saves one /64 network (e.g. you only have a /60 from your ISP)
- It allows the link to be agnostic to what ever Global Prefix you have (or how often it changes)
- When running RIPng, as I am, the source address for the Route advertisement must be a link-local address
Scroll down, and fill in the blanks for the Peer router:
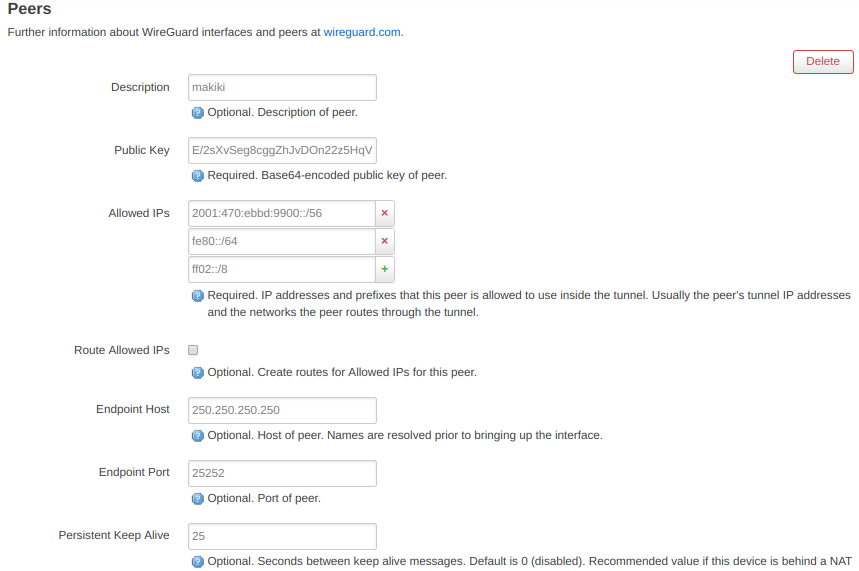
The Public Key is the public key of the peer router (R1 in the above network diagram) which you need to create a private/public key pair on that router as well.
The allowed IPs are the address blocks that you are going to allow into the VPN tunnel. Since the Peer is R1, and my address plan allocates a /56 to that router, I put in that address. Additionally, I added the link-local network (fe80::/64), and multicast network (ff02::/8).
Note: when configuring this same page on the peer router (R1), just put in ::/0 and allow all traffic to the internet.
The next two blanks, state they are optional, but I have not been able to get Wireguard to work with them blank, so fill out the IPv4 address of the peer router (R1), and pick a port (the listening port of R1)
Click Save and Apply at the bottom of the page
Go configure the other router (R1) similarly (using R1s Private key, R2s Public Key, and so on).
Connecting WGNET
Now that everything is configured, click the connect button on the Network->Interfaces page for WGNET (on both routers) and if you configured everything correctly, the VPN will connect, and the interfaces will come up.
On the router using the wg show command to show the state of the connection. It should look something like this:
root@makiki:~# wg show
interface: WGNET
  public key: E/2sXvSeg8cggZhJvDOn22z5HqV+eSDduOw46BwBzww=
  private key: (hidden)
  listening port: 29998

peer: cqrT9TuDN3yAjRXprLVWYiH0tAgPxr8Np/HDIQ21+AM=
  endpoint: 250.250.250.250:29999
  allowed ips: ::/0, fe80::/64
  latest handshake: 1 minute, 46 seconds ago
  transfer: 1.05 MiB received, 1.03 MiB sent
  persistent keepalive: every 25 seconds
The key info is the latest handshake. If that isn't there, then the VPN isn't up, and you will need to go back and re-check your configuration.
The OpenWrt GUI also has this information under Status->WireGuard Status. (if it is blank, the VPN link isn't connected)
Setting up DHCPv6-PD
But getting the WireGuard VPN link up is only half the fun. You will quickly discover that you can't ping6 from a host connected to the R1 LAN ports (and wireless) for two reasons:
- the hosts on that LAN don't have GUA (Global Unique Address) yet
- There is no return route down to the R1 LAN (see address plan above)
Advertising RAs on the LAN and creating a DHCPv6 Client
The WireGuard interface is just an interface. We must use a stacked interface to run a DHCPv6 client on top of the WGNET interface. Create yet another interface on Router R1, called LAN6.
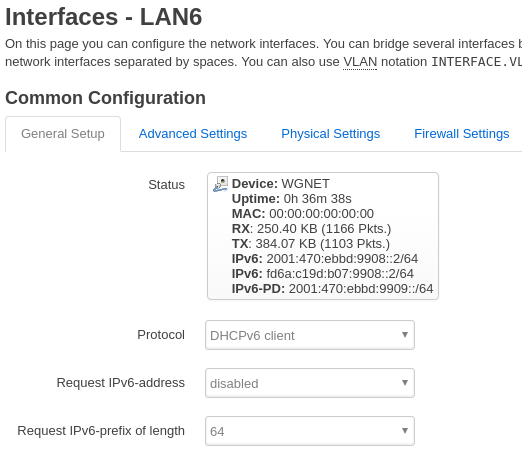
Select DHCPv6 Client as the interface type, and WGNET as the underlying interface. Then select Request IPv6-prefix length of 64 Click save and apply. Once the DHCPv6 client gets a Prefix Delegation from R2, the R1 LAN hosts will receive GUAs.
Setting up a DHCPv6-PD server on the upstream router
By configuring a DHCPv6-PD server on R2, not only will a PD be sent down to R1, but a route will be automagically installed on R2 pointing down to the Hosts attached to R1.
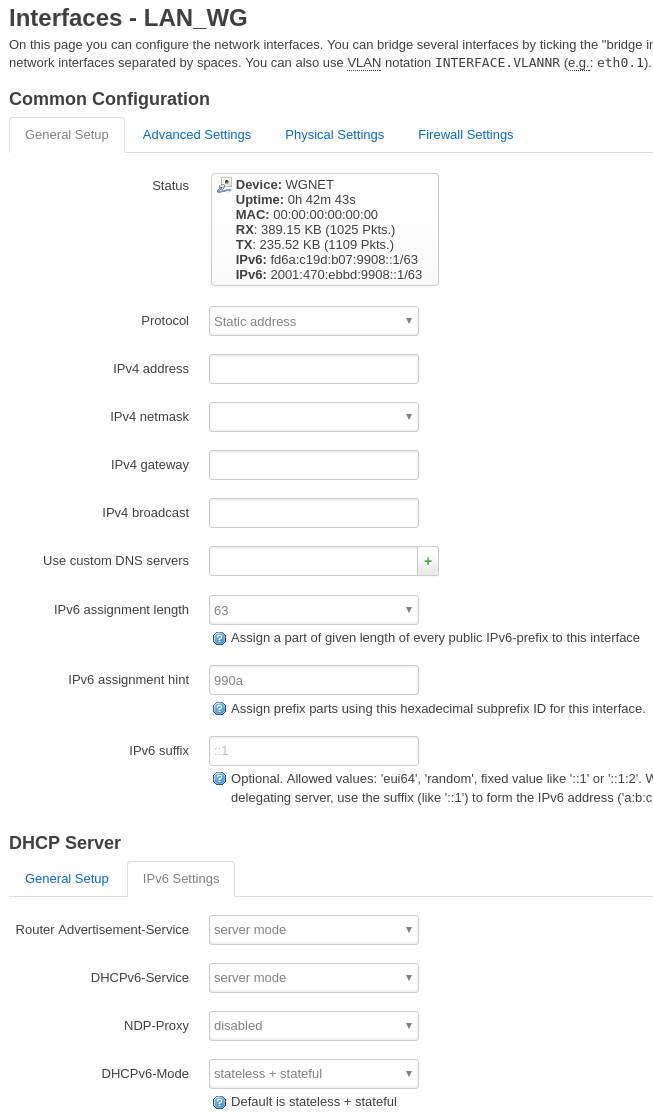
Configuring a DHCPv6-PD server on R2 is similar to the procedure on R1, In the web interface, Network -> Interfaces -> Add New Interface, create LAN_WG over the WGNET interface as a type Static Address. Then edit the following blanks:
- IPv6 Assignment length: 63
- IPv6 assignment hint: 990a, but you can try leaving this blank
Lower on the page, select the IPv6 Settings tab, and configure the following:
- Router-Advertisment-service: server mode
- DHCPv6-Service: server mode
- NDP-Proxy: disabled
- DHCPv6-Mode: stateless + stateful
Click save and apply.
Once that is setup, you should note that the LAN_WG interface on R2 now has a GUA. But more importantly, you should see that that the LAN6 interface on R1 not only has a GUA, but it also lists and IPv6-PD GUA prefix. This is the prefix that your hosts will receive, and will now be part of the IPv6 Internet
Advantages of DHCPv6-PD
The advantage of using DHCPv6-PD is that it will automagically update the addressing if your ISP changes your prefix. All your hosts will automatically pick up the new prefix, and will still have connectivity to the IPv6 Internet.
If you have a dynamic (read: changes often) prefix from your ISP, you will want to look into using ULAs (Unique Local Addresses) in your network (addresses which start with FD), and enter the ULAs in your DNS, rather than GUAs. Remember, DNS is your friend with IPv6.
OpenWrt Firewall
The default OpenWrt Firewall is pretty good both for IPv4 and IPv6. Since I am running a separate router (R2) in my DMZ, I decided that traffic on the WGNET VPN would be trusted, and I just added WGNET to the LAN Zone. If you don't have several OpenWrt routers laying around the house, and you are going to run the WireGuard VPN on your main house router, then you will want to create a Zone specifically for that traffic.
Road Warrior
What if your remote location is not static? What if the Evil NATland router changes your port? How can you fill in the Peer IP address and port if you have unpredictable NAT changing things on your?
I am still working on it. The real solution would be to leave the Peer IP and Port info blank, and let WireGuard figure it out. But alas with OpenWrt 18.06.1 or 18.06.2 that doesn't work.
As a work-around, I have created a script for R2 which listens for the Peer, and reconfigures the R2 WireGuard IP and Port info dynamically. The script is on github.
Limitations
Although WireGuard works quite well at tunneling IPv6 through multiple layers of NAT, it is not without its limitations.
Network blocks UDP
The biggest limitation is when the NAT-Land operator has decided to block all UDP (won't even pass DNS, they redirect it to their servers instead). Unfortunately, that includes McDonald's and Tim Hortons. Since WireGuard only uses UDP for transport this is a show stopper. Network UDP support can be determined rather quickly by using traceroute with something like:
traceroute 8.8.8.8
This should take more than a few hops.
Network Latency
Anytime you tunnel IPv6 inside of IPv4, the network latency of IPv6 will never be less than that of IPv4. Therefore the performance of IPv6 will not be shown at its best. A native IPv6 connection can out perform a IPv4 one, since there is no NAT.
IPv6 Oasis in the desert sands of NAT-Land
A tunnelled IPv6 connection is always less desirable than a native one, but using WireGuard does allow one to use IPv6 when stuck in the deserts of IPv4 NAT-Land. And by using it with OpenWrt, the Oasis just got roomy enough to share with your friends.
5 February 2019