LXD Containers: DeCompiling Python & enabling IPv6

|
by Craig Miller
Linux Containers (LXD) are fun to use, and they provide excellent isolation permitting the installation of two different web servers, for example, each listening on port 80! All running on a single Raspberry Pi. In this lab, we'll do exactly that. But not just two webservers, but two very different webservers, the venerable Apache and the up-and-coming new-comer, nginx.
Doing something useful with LXD (Review)
We'll use the MACVLAN interface to connect our new Linux container to the network. As a refresher, the diagram looks like:
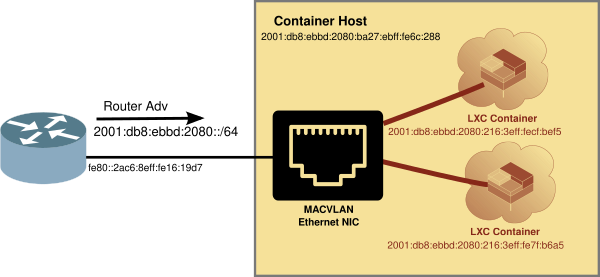
If you are using the LXD Starer SD Card, then the default profile will already be configured to use MACVLAN interfaces. If not see LXD Essentials on how to create a profile for MACVLAN
Picking a distro for your LXD container
I am a big fan of Alpine Linux for containers, however because Alpine starts out bare bones, it is sometimes easier to start out with a distro which has more included in the base OS.
We'll use Alpine Linux to create three (3) containers in this lab. Normally, I would use the latest version (3.18 as of this month), but in order to run the Python Decompiler, we need to run an older version, 3.15.
Motivation for decompiling Python
A couple of years ago, I wanted to run MotionEye, video surveillance software for the Pi. It supports many USB and IP-based cameras, and even the Pi Cam. However, it didn't support IPv6. The author had written MotionEye in Python, but had only supplied pyc files, including the settings file, which contained what interface the software would listen to.
So I looked around and found a python decompiler called uncompyle6. The world has moved on, and uncompyle6 does not work with the latest Python version of 3.11.4.
The beauty of containers, is running different versions of python in different containers. It wasn't hard to install an older version of Alpine Linux, to get Python 3.10, which the uncompyle6 doc says is supported. Alas this didn't work either.
Running Python Decompiler with Python 2.7
By creating and deleting containers, I was able to get uncompyle6 to run with Python 2.7.18 in Alpine Linux 3.15. This is not ideal, however the MotionEye software is also written in Python 2.7.
Let's create the container for uncompyle6
lxc launch images:alpine/3.15 uncompiler
Then step inside the container and install the software:
lxc exec uncompiler sh

apk update
apk add python2
apk add curl
curl https://bootstrap.pypa.io/pip/2.7/get-pip.py --output get-pip.py
python get-pip.py
pip install uncompyle6
pip was a little tricky under Python 2.7, since it has been deprecated. But this article pointed me in the right direction.
Once pip is installed, it is an easy install line to get uncompyle6 inside the container.
Security Note: Normally, I wouldn't just reach out to the internet, and grab a script which I then run as root on my machine. But with the isolation provided by LXD (Linux Containers), if the script goes rogue, it is easy to just delete the entire container (or restore from a snapshot).
DeCompiling Python
We are now ready to run uncompyle6 on the MotionEye settings.pyc file. First, we need to get the pyc file. Inside the container:
curl http://www.makikiweb.com/netsig/labs/uncompyle6_settings.pyc > settings.pyc
uncompyle6 -o . settings.pyc
There should be a settings.py file in your directory, which now can be edited. To enable IPv6, we need to edit the line:
LISTEN = '0.0.0.0'
And in this case, we need to change that line to read:
LISTEN = ''
Now it is a matter of putting the edited settings.py file back onto MotionEye SD Card, deleting the old settings.pyc so that when MotionEye runs again, it will regenerate a pyc file, and IPv6 will be enabled!
To see all the gory details of how to enable IPv6 on MotionEye, refer to the article Enabling IPv6 on MotionEye

MotionEye capturing a curious hummingbird
Creating an IPv6 enabled Apache webserver
Fortunately, it is easier to change configuration files of Apache webserver (no python decompiling required). Let's spin up another container, this time with the latest version of Alpine Linux (3.18 as of this writing):
lxc launch images:alpine/3.18 apache
Step inside the container and install Apache
lxc exec apache sh

apk update
apk add apache2
Apache has been around for nearly 30 years, and fortunately, it comes IPv6 enabled out of the box, but let's go inspect the config file.
cd /etc/apache2/
vi httpd.conf
Look for the line:
Listen 80
This can be made more explicit by using the following:
Listen [::]:80
And start the webserver:
/etc/init.d/apache2 start
Now to check that the webserver is actually listening to port 80 on IPv6 and IPv4, use the netstat command:
# netstat -anp
Active Internet connections (servers and established)
Proto Recv-Q Send-Q Local Address           Foreign Address         State       PID/Program name
tcp        0      0 :::80                   :::*                    LISTEN      618/httpd
netstat shows a triple colon :::80 which is a bit misleading. It really means [::]:80 the double colon means any address, and the ':80' means port 80.
But how is IPv4 supported? IPv6 has the concept of Mapped Addresses which allows an IPv6 listener, such as apache to receive requests on both IPv4 and IPv6.
Creating an IPv6 enabled nginx webserver
We'll spin up another container to run an nginx webserver, the world's most used (or popular) webserver.
lxc launch images:alpine/3.18 nginx
Step inside the container and install nginx
lxc exec nginx sh

apk update
apk add nginx
Again, nginx supports IPv6 out of the box, but let's look at the config file, specifically the listen lines:
cd /etc/nginx/http.d
vi default.conf
    listen 80 default_server;
    listen [::]:80 default_server;
As you can see, there are two listen lines unlike the Apache configuration file. And it uses the explicit listen [::]:80 default_server; line for IPv6.
Start the nginx webserver and check the listeners with the netstat command:
/etc/init.d/nginx start

# netstat -anp
Active Internet connections (servers and established)
Proto Recv-Q Send-Q Local Address           Foreign Address         State       PID/Program name
tcp        0      0 0.0.0.0:80              0.0.0.0:*               LISTEN      560/nginx.conf
tcp        0      0 :::80                   :::*                    LISTEN      560/nginx.conf
As you can see nginx is not relying solely on Mapped Addresses to support IPv4, and it creates a second listener for IPv4.
Testing your brand new webservers
Note the IPv6 address of your webservers with a lxc ls command, and enter the raw and ugly IPv6 address into your web browser (such as firefox or chrome). Because colons mean something else to the browser, you will need to put the bare IPv6 address in square brackets like so:
http://[2001:db8:e992:cc40:216:3eff:fec7:8df0]/
You can also look at your webserver's access log with tail -f access.log to see the web requests come in, in real time!
For apache:
tail -f /var/log/apache2/access.log
For nginx:
tail -f /var/log/nginx/access.log
Q & A
This is our forth, and last (for now) Linux Container session. I like Linux Containers because they are light weight enough to run on a Pi, and then run them on a faster machine, if you need more power.
Using LXD on a Pi
You can enjoy the advantages of Linux Containers in your own home by installing it on a Pi. While it is cool to just run containers, they can also do useful things, such as development sandboxes, a video conferencing app, run a Pi-Hole, or even explore networking a bit more.
Notes:
17 July 2023