LXD Essentials

|
by Craig Miller
I have been running Linux Containers (LXD) for several years now, and I have found them really useful. The key advantages of Linux Containers are:
- Running full Linux OS inside a container, which makes troubleshooting much easier (than Docker)
- Cloud-like experience. Cloud computing has taken off, not just because it is someone else's computer, but because it has made spinning up a server easy. Linux Containers provides a similar easy experience in adding a server. Some of the capabilities are: snapshots of containers, transferring containers from one host to another, quick creation and removal of containers.
- Secure and scalable. Linux containers run by default, as unprivilaged thereby protecting the host system. And because Linux Containers are light weight, I have been able to scale up webserver containers to over 30 running on a Raspberry Pi 3B+.
Installing LXD on Pi OS
One only need follow the instructions on the Raspberry Pi website to get your Pi running the latest Pi OS.
For reasons unbeknownst to mere mortals, Ubuntu has decided to not include LXD in the repository, but rather use snapd to install LXD.
Once the Pi is booted, install snapd using apt-get (or apt install if you prefer)
sudo apt-get install snapd  bridge-utils
sudo snap install core lxd
Add yourself to the lxd group so you won't have to type sudo all the time.
sudo usermod -aG lxd craig
newgrp lxd
In order to have lxd in your path, it is easiest to log out and log back in again.
Then run lxd init to initialize the Linux Containers daemon. If you are unsure, just take all the defaults.
For MACVLAN, select none for What IPv4 address should be used? AND What IPv6 address should be used?
My old way of setting up networking was more like a physical network, using a linux bridge (like an ethernet switch) to provide connectivity for all the containers and the host.
But there is an easier way, by using a MACVLAN network attachment.
Setting up MACVLAN networking
The MACVLAN technique uses the features of modern network interfaces (NICs) that support virtual interfaces. With virtual interface support, a single NIC can support not only multiple IP addresses, but several MAC (Media Access Control) addresses as well.
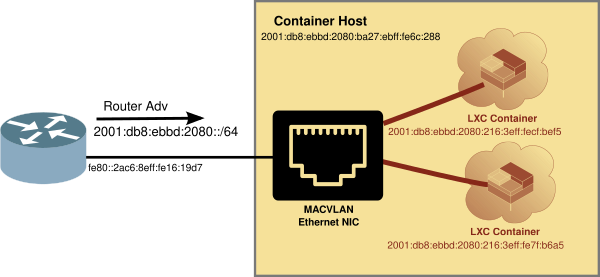
Creating LXD Profile for MACVLAN
To create a profile that will connect the container to the Host NIC via MACVLAN:
- First copy the default profile
- Then change a couple of lines, specifically the nictype and the parent. The parent is the name of the host ethernet device. On a Raspberry Pi running Pi OS, it is eth0.
$ lxc profile copy default macvlan
$ lxc profile edit macvlan      #edit the profile as shown below
$ lxc profile show macvlan
config: {}
description: Default LXD profile
devices:
  eth0:
    nictype: macvlan
    parent: eth0
    type: nic
  root:
    path: /
    pool: default
    type: disk
name: enet
used_by: []
Using the MACVLAN profile
Now that you have a MACVLAN profile, using it is as simple as launching a new container with the -p macvlan option. For example, firing up a Container running Alpine OS:
$ lxc launch -p macvlan images:alpine/3.16 test
Creating test
Starting test
$
Looking at the container running with the lxc ls command:
$ lxc ls
+---------+---------+------------------------+-----------------------------------------------+-----------+-----------+
|  NAME   |  STATE  |          IPV4          |                     IPV6                      |   TYPE    | SNAPSHOTS |
+---------+---------+------------------------+-----------------------------------------------+-----------+-----------+
| test    | RUNNING | 192.168.215.129 (eth0) | fd73:c73c:444:0:216:3eff:fe65:2b99 (eth0)     | CONTAINER | 0         |
|         |         |                        | 2001:db8:8011:fd44:216:3eff:fe65:2b99 (eth0)  |           |           |
+---------+---------+------------------------+-----------------------------------------------+-----------+-----------+
And you can see that the new container already has an IPv4 and IPv6 addresses (from my router).
Congratulations, you have a container up and running and attached to the Internet.
Some Basic LXD Commands
LXD, which does all the heavy lifting of Linux Containers, will run as a daemon on your host (e.g. the Pi), and there is a user space command lxc that communicates with the lxd daemon.
Backing up/Restoring a Container
LXD uses snapshots to create backups of your container. You can create multiple snapshots by giving them different names.
# create a snapshot
lxc snapshot test snap0

# restore from a snapshot
lxc restore test snap0

# delete the snapshot
lxc delete test/snap0
Creating your own images
It is also possible to create an image from a snapshot that can then be used to create more containers (think of an image with a webserver installed and configured). After making a snapshot, use the lxc publish command to create an image from the snapshot
lxc publish test/snap0 --alias my_webserver
You can see the snapshot, now image with the following command
lxc image ls
+--------------+--------------+--------+-----------------------------------------+--------------+-----------+---------+-------------------------------+
|    ALIAS     | FINGERPRINT  | PUBLIC |               DESCRIPTION               | ARCHITECTURE |   TYPE    |  SIZE   |          UPLOAD DATE          |
+--------------+--------------+--------+-----------------------------------------+--------------+-----------+---------+-------------------------------+
| my_webserver | 05916da4f91a | no     | Alpinelinux 3.16 armhf (20221031_13:02) | armv7l       | CONTAINER | 5.30MB  | Nov 13, 2022 at 11:35pm (UTC) |
+--------------+--------------+--------+-----------------------------------------+--------------+-----------+---------+-------------------------------+
Copying files to and from your container
LXD has a provision to copy files to and from your container with the file pull and file push commands.
For example, copy the container password file to the host /tmp directory:
cd /tmp

lxc file pull test/etc/passwd .
And to copy the file back to the container:
lxc file push /tmp/passwd test/etc/passwd
Starting/Stopping your container
Of course containers can be started and stopped. Because they have a persistent MAC address, they will get the same IP address from your router when the container is restarted. This makes the container very DNS friendly. Make a note of the IP addresses, and put them in your DNS to make them easier to access the next time.
lxc stop test
To start it again
lxc start test
Stepping inside a container
Of course, you can install sshd and use ssh to gain access to your container, but there is an easier way, by using the exec command.
lxc exec test sh
~ # cat /etc/os-release
NAME="Alpine Linux"
ID=alpine
VERSION_ID=3.16.2
PRETTY_NAME="Alpine Linux v3.16"
~ # exit
$
Typing exit exits the exec command and returns you to the host prompt.
Using the pre-built image server
Ubuntu creates over 400 LXD images for many distros/architectures nightly (or at least weekly). LXD knows how to access these images via images: To see what pre-built images are available use the lxc image ls command.
# look at the pre-built Alpine images
lxc image ls images:alpine
+------------------------------+--------------+--------+--------------------------------------+--------------+-----------------+----------+-------------------------------+
|            ALIAS             | FINGERPRINT  | PUBLIC |             DESCRIPTION              | ARCHITECTURE |      TYPE       |   SIZE   |          UPLOAD DATE          |
+------------------------------+--------------+--------+--------------------------------------+--------------+-----------------+----------+-------------------------------+
| alpine/3.13 (3 more)         | 465e5608b5c5 | yes    | Alpine 3.13 armhf (20221113_13:01)   | armv7l       | CONTAINER       | 2.79MB   | Nov 13, 2022 at 12:00am (UTC) |
+------------------------------+--------------+--------+--------------------------------------+--------------+-----------------+----------+-------------------------------+
| alpine/3.13/amd64 (1 more)   | 7b1e97052986 | yes    | Alpine 3.13 amd64 (20221113_13:00)   | x86_64       | VIRTUAL-MACHINE | 92.69MB  | Nov 13, 2022 at 12:00am (UTC) |
+------------------------------+--------------+--------+--------------------------------------+--------------+-----------------+----------+-------------------------------+
| alpine/3.13/amd64 (1 more)   | 82b60dc101af | yes    | Alpine 3.13 amd64 (20221113_13:00)   | x86_64       | CONTAINER       | 3.09MB   | Nov 13, 2022 at 12:00am (UTC) |
+------------------------------+--------------+--------+--------------------------------------+--------------+-----------------+----------+-------------------------------+
| alpine/3.13/arm64 (1 more)   | 33f6d53f7d9e | yes    | Alpine 3.13 arm64 (20221113_13:01)   | aarch64      | VIRTUAL-MACHINE | 82.61MB  | Nov 13, 2022 at 12:00am (UTC) |
+------------------------------+--------------+--------+--------------------------------------+--------------+-----------------+----------+-------------------------------+
| alpine/3.13/arm64 (1 more)   | a85a426e3a1c | yes    | Alpine 3.13 arm64 (20221113_13:01)   | aarch64      | CONTAINER       | 2.81MB   | Nov 13, 2022 at 12:00am (UTC) |
+------------------------------+--------------+--------+--------------------------------------+--------------+-----------------+----------+-------------------------------+
...
| alpine/edge/ppc64el (1 more) | 97f9bdb337ab | yes    | Alpine edge ppc64el (20221113_13:01) | ppc64le      | CONTAINER       | 2.82MB   | Nov 13, 2022 at 12:00am (UTC) |
+------------------------------+--------------+--------+--------------------------------------+--------------+-----------------+----------+-------------------------------+
| alpine/edge/s390x (1 more)   | 6ebc4ec00d78 | yes    | Alpine edge s390x (20221113_13:01)   | s390x        | CONTAINER       | 2.60MB   | Nov 13, 2022 at 12:00am (UTC) |
+------------------------------+--------------+--------+--------------------------------------+--------------+-----------------+----------+-------------------------------+
As you can see, there are not only different versions of the Alpine image built, but also versions built as a container, and others as a virtual machine. In order to run Virtual Machines (VMs) you will need a host running 64-bit mode.
Because there are so many images being built these days, it may be easier to peruse the list in your browser. Here is a link to the list of LXD pre-built images
Linux Containers prevent polluting your host system
Another reason why I use Linux Containers is to prevent polluting my host system. Say I want to install a new application, but it has a lot of dependencies, or perhaps requires a different version of Python. Sure you can run PyEnv. But that only works for pure python applications.
I find it easier to fire up a fresh container, and install away inside the container. If I get it working to a point, I will make a snapshot, so I can easily roll back the container to a known good working point. And all the while the host system remains clean, and unpolluted.
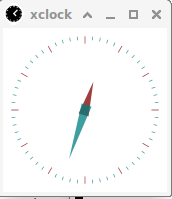
Running GUI applications inside your container
While is possible to install vnc server in your container, and attempt to run a desktop, I find it much easier to ssh -X into the container, and allow ssh to handle the X forwarding and display the GUI app on my laptop's Xserver (use Xming if using a windows laptop).
For example to run xclock in a container, and have the display brought back to your laptop. Install xclock into the container, then ssh to the container, and start the xclock program.
ssh -X my_container
$ xclock &
$
Just getting on a roll
This is just the Linux Containers Essentials. There is much more you can do with LXD, including running clusters, copying containers between hosts, or running containers from your own images.
I have written several articles about Linux Containers over the years, here's just a few:
- Linux Containers (LXD) + Virtual OpenWrt router on the Raspberry Pi A server farm with Virtual Router/Firewall in the Palm of your hand, with excellent IPv6
- Running VMs with LXD
- Accessing Raspberry Pi GPIO from a LXD Container
- Virtual OpenWrt on LXD Redux (now, even easier!)
- LXD Dashboard, the IPv6-enabled Web GUI for LXD
- LXD MACVLAN Containers
Once you start running Linux Containers, you may never want to go back.
15 November 2022