LXD Containers: Installing Pi-Hole

|
by Craig Miller
Linux Containers (LXD) are fun to use, typing lxc ls and all, but what about doing something useful? One of the things I really like about LXD is that rather than dedicate your Raspberry Pi to one thing, you can do multiple things, each running in their own container.
Some of the useful things I have running in containers at my house are:
- Open source git repositories, complete with configured keys for github. If I am going to submit some code to github, I just ssh into that container, add the code, and do a
git push(to github). I used to have a dedicated machine for this, now I have a dedicated Linux container - LXDware web-based control of LXD. Makes management of my containers easier
- Testing other Linux repos. I have a Devuan just to see what is in the repo
- Medical imaging. As mentioned earlier, the medical field had to standardize on a image format in the 1980 (before there was GIF, JPEG, or PNG). They standardized on DICOM (Digital Imaging and Communications in Medicine) image format. In order to see these, one has to use a specialized program, such as xmedcon, or aeskulap
- Reading BC QR Codes. Back when BC issued QR (Quick Response) codes for Covid-19 shots, I was curious what data was stored in the QR code. I used a Linux Container to create a development sandbox, and using other's python programs, I created bc-covid-card-reader, an open source BC Medical QR Code reader.
- Video Conferencing Galene Application. A cool alternative to Jitsi, and much easier to setup. It is written in the go language, and a Linux container is a perfect sandbox for development.
- REACT! Developed a open-source reaction time measuring game on the Pi, accessing hardware GPIO pings from inside a container
The nice thing about all the above, is that it was easy to spin-up a new Linux Container, and start playing in the sandbox.
Doing something useful with LXD
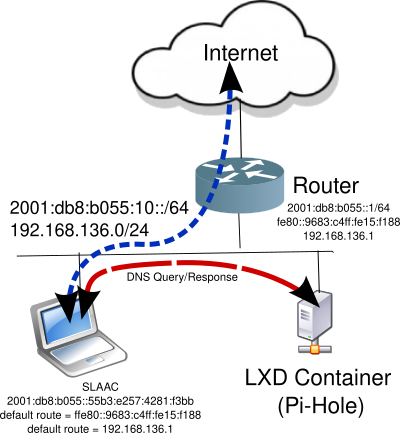
We'll use the MACVLAN interface to connect our new Linux container to the network. As a refresher, the diagram looks like:
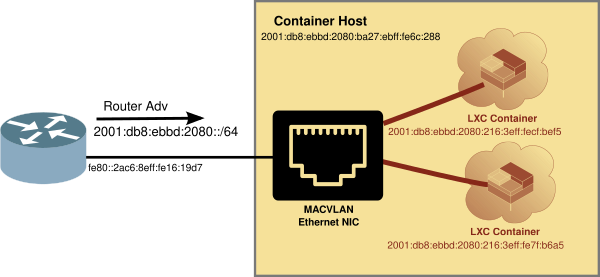
If you are using the LXD Starer SD Card, then the default profile will already be configured to use MACVLAN interfaces. If not see LXD Essentials on how to create a profile for MACVLAN
Picking a distro for your LXD container
I am a big fan of Alpine Linux for containers, however because Alpine starts out bare bones, it is sometimes easier to start out with a distro which has more included in the base OS.
It is easy to start with a Debian or Ubuntu distro as the base OS of your container.
lxc launch images:ubuntu/jammy my-container
Or if you are using LXDware, first, download an image under Images->+Image
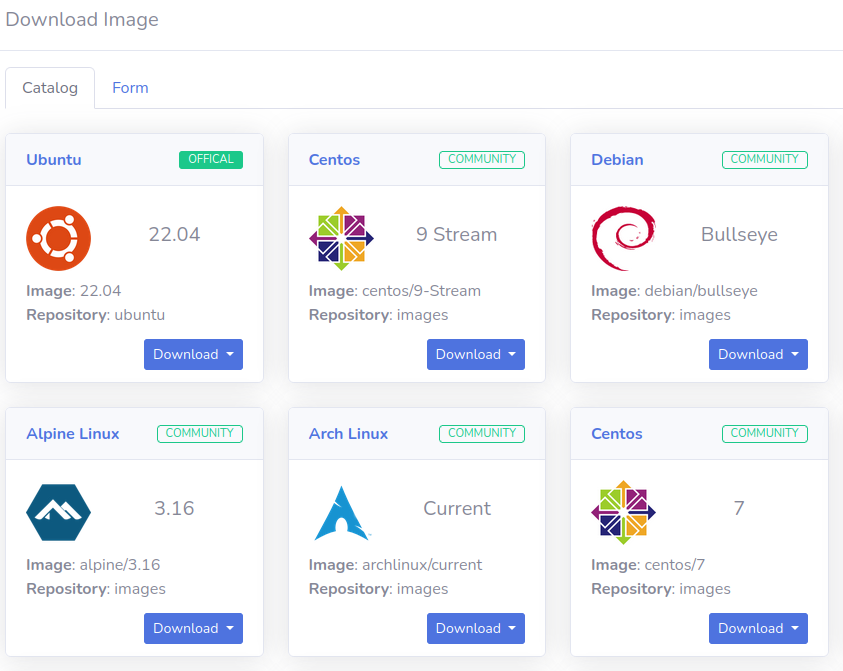
Then under Containers->+Container select your downloaded image
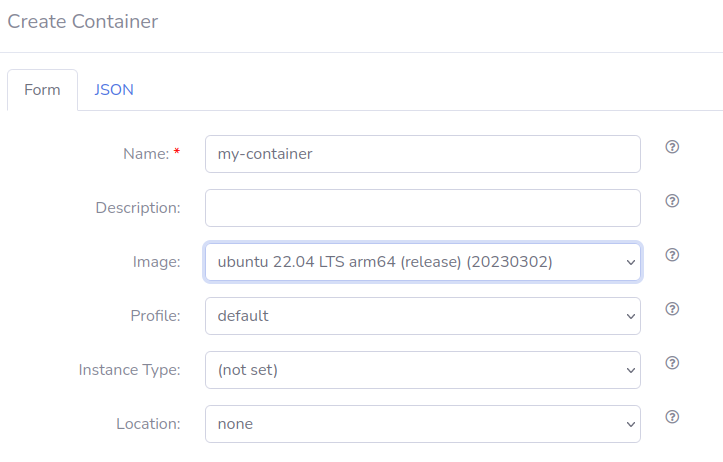
I tend to select Debian rather than Ubuntu, since I usually don't need the extra stuff Ubuntu includes.
lxc launch images:debian/bullseye my-container
Creating a Pi-Hole container
Now that you have created a container, I called mine pi-hole
You can rename your container by using the following:
lxc stop my-container
lxc rename my-container pi-hole
lxc start pi-hole
Once your pi-hole container is running, step into the container with the following command:
lxc exec pi-hole bash
Start the Pi-Hole installation
Now that you have stepped into your container (above), run the following command (as root). Running install scripts as root is never a good idea on your host machine, since the install script could do malicious actions, from which you won't be able to recover. But since we are inside a container, if it goes bad, we'll just delete the container.
apt-get update
apt-get install curl

curl -sSL https://install.pi-hole.net | bash
Curl will pull down the installation script and feed it to bash. Normally, I would say this is a terrible thing to do, since you are running a random script as root. But since we are in a container, the worst that can happen is that the container is been infected, or turned into a malicious bot. But since it is a container, you can just stop the container and delete it, should this happen. The host OS (Pi OS) is not affected by the container.
The install script will pull down lots of packages, and do some configuring and eventually will give an output that looks like:
...
[v] Pi-hole Enabled
[i] Web Interface password: R3-JswmZ
[i] This can be changed using 'pihole -a -p'

[i] View the web interface at http://pi.hole/admin or http://192.168.243.213/admin

[i] You may now configure your devices to use the Pi-hole as their DNS server
[i] Pi-hole DNS (IPv4): 192.168.243.213
[i] Pi-hole DNS (IPv6): fd2a:f90c:fd47:0:216:3eff:fe0b:6cc9
[i] If you have not done so already, the above IP should be set to static.

[i] The install log is located at: /etc/pihole/install.log
[v] Installation complete!
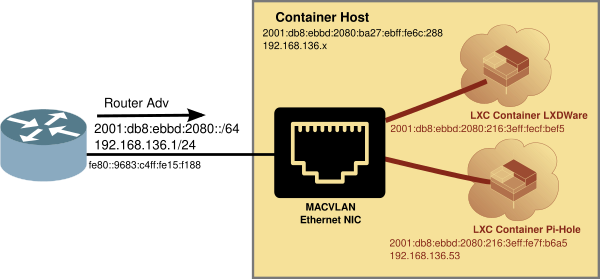
You IPv6 and IPv4 addresses will be different (since they will be the IP addresses of your container).
Now your Linux Containers should (logically) look like:
Setting up the Pi-Hole in your Network
Configuring the Pi-Hole depends on how you want to configure your network. There are two options:
- DNS-only
- DNS + DHCP
We'll be using case 1 (DNS-only) for the lab. Both cases require configuring your router to: Send out the DHCPv4 option (6) of your Pi-Hole as the network DNS server
And for case 2: DNS + DHCP, you will also have to disable DHCP on your router, and enable the DHCP server on the Pi-Hole
How does Pi-Hole work
When configured as your network DNS server (case 1), the Pi-Hole will receive DNS requests from the devices on your network, look up if the request is an Ad URL, or other black-list domain, and return a valid IP address, if the request is valid, otherwise, it will return an unusable address (:: or 0.0.0.0) which prevents the Ad from loading, since this address can not be used as a destination address (see RFC 1122 or RFC 4291), the unspecified address in IPv6)
Configuring Pi-Hole for DNS-Only operation
Using the DNS-Only use-case is the easiest way to use the Pi-Hole, because it defaults to this method.
- Install Pi-Hole (in our case, inside a Linux Container)
- Reconfigure your router to hand out the Pi-Hole as a DNS server (as part of the DHCP transaction)
- Reboot or reconnect your device (such as a laptop) to the network to get the new DNS configuration
- Use the internet without Ads!
Advantages of running Pi-Hole
Something I have been suggesting for some time, is that everyone should run their own DNS server in their house. Remembering IP addresses of your devices does not scale, and certainly doesn't work for IPv6!
A note about FQDNs
Fully Qualified Domain Names (FQDNs) are internet names such as www.google.com or www.makiki.ca. Inside your house, you may want to use a shorter FQDN for your hosts to save typing.
There are two common and one reserved FQDN that can be used in your house:
- .local - Used by mDNS (Multicast DNS). Used typically when there is NO DNS server on the network
- .lan - Commonly used, but could be assigned by IANA in the future (as .box was in 2016)
- .home.arpa - Official home FQDN (as per RFC 8375)
If your router supports DNS Search List configuration, you can add .home.arpa to the DHCP option (119), and then you won't have to type the FQDN suffix (such as .home.arpa) every time you want to resolve a device on your network. Many routers (not running OpenWrt) won't support this DHCP option.
Adding DNS records in Pi-Hole
After logging into the Pi-Hole, note the menus along the left side of the browser window. Select Local DNS, and two additional menu items will appear, select DNS Records
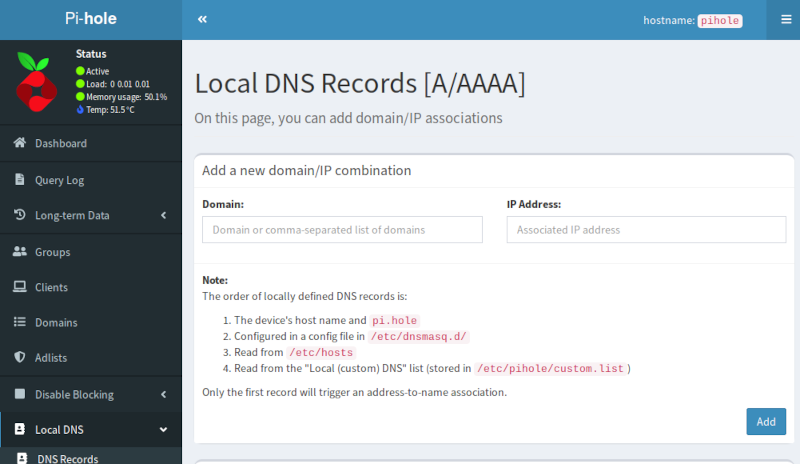
The Pi-Hole terminology is a little misleading here. What they call Domain is really a hostname which can or cannot be a FQDN. You can just put in the hostname without the FQDN suffix, and it will work.
Once you get more than a handful of hosts on your network (easily done with LXD Containers), DNS is your friend. You can see the hosts that you have entered in the lower part of the Pi-Hole window.
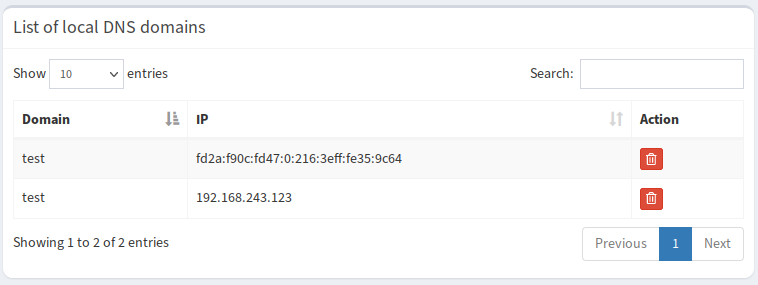
In the example above, you can see the host test has both an IPv4 and a IPv6 (ULA) address.
HANDS ON: Add the IP addresses of your containers into the Pi-Hole Local DNS web page.
Testing DNS records with the host command
In the lab, the router has not been configured to hand out your Pi-Hole server as DHCP option 6 (DNS server), since there are many Pi-Holes running on the network. But that doesn't mean we can't test the Pi-Hole DNS server.
Using a terminal and the host command, we will make a DNS request. You can use the dig if you are familiar with it, but I find host simpler to use.
$ host test 2001:db8:8011:fd44::334
Using domain server:
Name: 2001:db8:8011:fd44::334
Address: 2001:db8:8011:fd44::334#53
Aliases:

test has address 192.168.243.123
test has IPv6 address fd2a:f90c:fd47:0:216:3eff:fe35:9c64
The host command takes 2 arguments, the second being optional. The first argument is the host you want to lookup. The second, optional, argument is the DNS server IP address you wish to direct the DNS request to. You can supply a IPv4 or IPv6 address of the DNS server.
In the above example, I am making a DNS query about the host test and I used the IPv6 address of the DNS server (the Pi-Hole running in a LXD container)
Testing that Pi-Hole is blocking Ads
We'll use the host command again, but make a query on a popular Ad server
$ host k3vzn.flx10.com 2001:db8:8011:fd44::334
Using domain server:
Name: 2001:db8:8011:fd44::334
Address: 2001:db8:8011:fd44::334#53
Aliases:

k3vzn.flx10.com has address 0.0.0.0
k3vzn.flx10.com has IPv6 address ::
Since the Pi-Hole returned an unusable address, the Ad will not be loaded.
Caveats of DNS-only operation
As you have seen DNS-only operation with the Pi-Hole is easy to setup and use. However there are a few caveats:
- When using DNS + DHCP use case, hosts which make DHCPv4 requests will auto populate in the DNS. For example, if your host is named lxdhost10 it will automatically be learned by the Pi-Hole, and you will not need to enter it in the Local DNS section of the Pi-Hole.
- If you have IPv6 on your network, the router will still be handing out its own DNS server via the Router Advertisement (RA), which DHCPv4 will be handing out the Pi-Hole as the DNS server.
- This will result in confusion on your screen, as the IPv4 Ads will be blocked, but the IPv6 Ads will not be.
- If you are running OpenWrt on your router, you can configure it to Advertise the Pi-Hole's IPv6 address as the DNS server in the RA
- The Pi-Hole does not handle IPv6 SLAAC addressing. Unfortunately, the Pi-Hole developers have decided to only support DHCPv6. This means that the Android devices will not make DNS queries to the Pi-Hole in an IPv6-only network. See the Adblock on OpenWrt and IPv6. BTW, many IoT devices are based on Android.
Using LXD on a Pi
Of course, LXD runs on more powerful machines than just Raspberry Pi's. But you can enjoy the advantages of Linux Containers in your own home by installing it on a Pi. While it is cool to just run containers, they can also do useful things, such as development sandboxes, a video conferencing app or even run a Pi-Hole.
Notes:
- Don't enter IPv6 ULA addresses in DNS if you have also entered an IPv4 address for the same host. ULA (Unique Local Addresses) are prioritized below IPv4 addresses, and will never be used. If you want to use ULA addresses, only add that address for the host.
13 April 2023
updated 1 May 2023