LXD Starter SD Card for the Raspberry Pi

|
by Craig Miller
To make it easier to get started using LXD (Linux Containers) I have created a Starter SD Card. The card only works in a Raspberry Pi. As mentioned previously, the Pi must be ethernet attached to use Linux Containers. The card should work on the following Pi's:
- Raspberry Pi 3
- Raspberry Pi 3b+
- Raspberry Pi 4
It may work on lesser Pi's. It will not work on a Pi Pico (since that doesn't run Linux).
There is a default username of pi. Ask me for the password.
Connecting your Container to the Internet
The LXD on the SD Card uses MACVLAN type of interface. I have discussed this type of interface in previous presentations.
Using MACVLAN interface
The MACVLAN technique uses the features of modern network interfaces (NICs) that support virtual interfaces. With virtual interface support, a single NIC can support not only multiple IP addresses, but several MAC (Media Access Control) addresses as well.
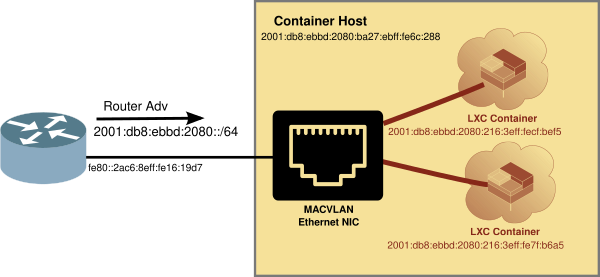
Network Diagram with MACVLAN
LXD Profile for MACVLAN set as default profile
The card has a modified default profile which utilizes the MACVLAN interface type.
LXD Containers use a profile to determine which resources to attach to, such as hard disk or network. The default LXD profile now looks like:
$ lxc profile show macvlan
config: {}
description: Default LXD profile
devices:
  eth0:
    nictype: macvlan
    parent: eth0
    type: nic
  root:
    path: /
    pool: default
    type: disk
name: enet
used_by: []
Using the MACVLAN profile on the SD Card
Since the card has MACVLAN set as its default profile, you can launch a new container with the following:
$ lxc launch images:alpine/3.16 test
Creating test
Starting test
$
Looking at the container running with the lxc ls command:
$ lxc ls
+---------+---------+------------------------+-----------------------------------------------+-----------+-----------+
|  NAME   |  STATE  |          IPV4          |                     IPV6                      |   TYPE    | SNAPSHOTS |
+---------+---------+------------------------+-----------------------------------------------+-----------+-----------+
| lxdware | RUNNING | 192.168.243.236 (eth0) | fd2a:f90c:fd47:0:216:3eff:fe90:59f1 (eth0)    | CONTAINER | 1         |
|         |         |                        | 2001:db8:8011:fd44:216:3eff:fe90:59f1 (eth0)  |           |           |
+---------+---------+------------------------+-----------------------------------------------+-----------+-----------+
| test    | RUNNING | 192.168.243.182 (eth0) | fd2a:f90c:fd47:0:216:3eff:fe05:20af (eth0)    | CONTAINER | 0         |
|         |         |                        | 2001:db8:8011:fd44:216:3eff:fe05:20af (eth0)  |           |           |
+---------+---------+------------------------+-----------------------------------------------+-----------+-----------+
And you can see that the new container already had IPv4 and IPv6 addresses (from my router). Let's try a ping from inside the container.
Checking connectivity from inside the MACVLAN attached Container
We'll step inside the container with the lxc exec command, and ping via IPv6 and IPv4.
$ lxc exec test sh

~ # ping -c 3 he.net
PING he.net (2001:470:0:503::2): 56 data bytes
64 bytes from 2001:470:0:503::2: seq=0 ttl=56 time=34.192 ms
64 bytes from 2001:470:0:503::2: seq=1 ttl=56 time=33.554 ms
64 bytes from 2001:470:0:503::2: seq=2 ttl=56 time=33.959 ms

--- he.net ping statistics ---
3 packets transmitted, 3 packets received, 0% packet loss
round-trip min/avg/max = 33.554/33.901/34.192 ms

~ # ping -c 3 1.1.1.1
PING 1.1.1.1 (1.1.1.1): 56 data bytes
64 bytes from 1.1.1.1: seq=0 ttl=59 time=11.835 ms
64 bytes from 1.1.1.1: seq=1 ttl=59 time=11.933 ms
64 bytes from 1.1.1.1: seq=2 ttl=59 time=11.888 ms

--- 1.1.1.1 ping statistics ---
3 packets transmitted, 3 packets received, 0% packet loss
round-trip min/avg/max = 11.835/11.885/11.933 ms
~ #
As you can see the container can get out to the internet.
Using Alpine Containers
Linux containers supports a variety of distros, including Debian, Ubuntu, and Fedora. Alpine Linux is a lightweight distro oriented toward embedded devices that is very small, and quick to launch or restart. The distro includes support for common open source software, such as nginx (web server), icecast (audio streaming), and even computer languages, such as python3, rust, and go.
Intro to Alpine
Alpine Linux uses its own package manager apk. Like other distros, the package database needs updating before you can load applications.
Step into the Alpine container using the command:
$ lxc exec test sh
~ #
Once inside the container, run the update command:
# apk update
fetch https://dl-cdn.alpinelinux.org/alpine/v3.17/main/aarch64/APKINDEX.tar.gz
fetch https://dl-cdn.alpinelinux.org/alpine/v3.17/community/aarch64/APKINDEX.tar.gz
v3.17.2-115-gec05b524bd2 [https://dl-cdn.alpinelinux.org/alpine/v3.17/main]
v3.17.2-118-gd2bff0ea302 [https://dl-cdn.alpinelinux.org/alpine/v3.17/community]
OK: 17683 distinct packages available
Some common actions you will want to do to make your container become just another host on your shelf, is to:
| Step | Action | Command |
|---|---|---|
| 1. | Add a User | adduser -h /home/myuser -s /bin/sh -S myuser |
| 2. | Give the user a password | passwd myuser |
| 3. | Install ssh server, nano & sudo | apk add openssh-server nano sudo xauth |
| 4. | Enable X11 forwarding on ssh server | sed -i 's/X11Forwarding no/X11Forwarding yes/' /etc/ssh/sshd_config |
| 5. | Start the ssh server | /etc/init.d/sshd start |
| 6. | Start server at boot | rc-update add sshd default |
To give your new user sudo privileges, you will need to edit the /etc/sudoers to allow the wheel group
Enable the wheel group to use sudo in the /etc/sudoers file (copy and paste the following line into your container)
sed -i 's/# %wheel ALL=(ALL:ALL) ALL/%wheel ALL=(ALL:ALL) ALL/' /etc/sudoers
Then use nano to edit the /etc/group and add your username to the end of the line:
wheel:x:10:root,myuser
ssh directly to your container
After adding the IP address of your container to local DNS server, you can now ssh directly to your container
ssh -X myuser@my-lxd-container
You can install graphical (GUI) applications to your containers, and use X-forwarding to your laptop to see the GUI application. (see LXD Essentials)
Enabling MACVLAN attached container to talk to the LXD Host
As mentioned, a downside of using MACVLAN interface is that the container cannot connect/ping the LXD Host. Most of the time, this isn't an issue, since the container will mostly be running some kind of service, web, audio streaming, etc. But there are occasions where communication between the host and the container is required. LXDware Dashboard is one of them.
A useful example is running LXD Dashboard. LXD Dashboard, a web front end for managing LXD, runs inside a container, but must talk to the LXD Host.
Using the lxd_add_macvlan_host.sh script
The lxd_add_macvlan_host.sh script will automagically create a MACVLAN interface on the LXD Host. Like all good scripts it has help. The script is already on the card in /home/pi/
$ ./lxd_add_macvlan_host.sh -h
    ./lxd_add_macvlan_host.sh - creates MACVLAN interface on LXD Host
    e.g. ./lxd_add_macvlan_host.sh -a
    -a  Add MACVLAN interface
    -4  Add MACVLAN IPv4 interface
    -r  Remove MACVLAN interface
    -i  use this interface e.g. eth0

 By Craig Miller - Version: 0.98
The script does not make any permanent changes to the host, but rather configures the MACVLAN interface on the fly. If you want this to be permanent, then invoke the script from /etc/rc.local (you may have to enable rc.local if you are using systemd).
The script supports IPv6 by default. If you want to support IPv4 as in a dual-stack network, use the -4 option to add IPv6 and IPv4.
$ ./lxd_add_macvlan_host.sh -4
Requesting Sudo Privileges...
Working ....
Waiting for IPv4 DHCP ....
Interface: host-shim added
Pau
Looking at the interfaces, you will note that there is an additional host-shim interface that has been added:
$ ip addr
1: lo: <LOOPBACK,UP,LOWER_UP> mtu 65536 qdisc noqueue state UNKNOWN group default qlen 1000
    link/loopback 00:00:00:00:00:00 brd 00:00:00:00:00:00
    inet 127.0.0.1/8 scope host lo
       valid_lft forever preferred_lft forever
    inet6 ::1/128 scope host
       valid_lft forever preferred_lft forever
2: eth0: <BROADCAST,MULTICAST,UP,LOWER_UP> mtu 1500 qdisc pfifo_fast state UP group default qlen 1000
    link/ether b8:27:eb:6c:02:88 brd ff:ff:ff:ff:ff:ff
    inet 192.168.136.140/24 brd 192.168.243.255 scope global dynamic noprefixroute eth0
       valid_lft 30348sec preferred_lft 23526sec
    inet6 2001:db8:8011:fd44::e79/128 scope global dynamic noprefixroute
...
3: wlan0: <BROADCAST,MULTICAST> mtu 1500 qdisc noop state DOWN group default qlen 1000
    link/ether b8:27:eb:39:57:dd brd ff:ff:ff:ff:ff:ff
4: lxdbr0: <NO-CARRIER,BROADCAST,MULTICAST,UP> mtu 1500 qdisc noqueue state DOWN group default qlen 1000
    link/ether 00:16:3e:82:62:46 brd ff:ff:ff:ff:ff:ff
14: host-shim@eth0: <BROADCAST,MULTICAST,UP,LOWER_UP> mtu 1500 qdisc noqueue state UP group default qlen 1000
    link/ether 02:27:eb:6c:02:88 brd ff:ff:ff:ff:ff:ff
    inet 192.168.243.185/24 brd 192.168.243.255 scope global dynamic noprefixroute host-shim
       valid_lft 42483sec preferred_lft 37083sec
    inet6 2001:db8:8011:fd44::e79/128 scope global dynamic noprefixroute
Using LXDware Dashboard
The card already has the latest version of LXDware Dashboard installed in the container named lxdware (v3.6). The host Pi LXD has been pre-configured with the lxdware certificate, and the option to listen on port 8443.
After running the lxd_add_macvlan_host.sh script on the Pi host (from the pi account), point your web browser to the IP address of the lxdware container. You can use the IPv4 or IPv6 address of the container. You will see a login screen.

The username is vipi. Ask me for the password.
Once logged in, refer to the LXDware Dashboard to add the remote host (enter the name or IP address of the Pi Host)
Once LXDware Dashboard has connected to the remote host, you can manage containers on your Pi via the LXDware Dashboard web GUI (see LXD Dashboard, the IPv6-enabled Web GUI for LXD for more on how to use LXDware Dashboard).
Containers for isolation and fun
I have written several articles about Linux Containers over the years, here's just a few:
- LXD Essentials, a quick primer on Linux Containers on the Pi and similar Linux hosts
- Linux Containers (LXD) + Virtual OpenWrt router on the Raspberry Pi A server farm with Virtual Router/Firewall in the Palm of your hand, with excellent IPv6
- Running VMs with LXD
- Accessing Raspberry Pi GPIO from a LXD Container
- Virtual OpenWrt on LXD Redux (now, even easier!)
- LXD Dashboard, the IPv6-enabled Web GUI for LXD
- LXD MACVLAN Containers
Containers not only isolates software and doesn't pollute your main OS, but it has cool cloud-like features too!
Notes:
- In a managed Wifi network (which 99% are), the Access Point (AP) will only talk to the MAC address of the client which registered with the AP. A MACVLAN will try to use additional MAC addresses which will be rejected by the AP (since those addresses are not registered with the AP. That doesn't mean that you couldn't try to set up a Wireless Bridge with Wireless Distribution System (WDS), but that is beyond the scope of this article. For now, think of MACVLAN as only using your Ethernet NIC.
2 March 2023
Updated 24 March 2023