Introduction to Penetration Testing Part 2

|
by Craig Miller
In this session we will continue pen testing, but this time a focus on Network Pen Testing. Not from the host perspective, but from Services standpoint. THC (The Hacker's Choice) has been a collection of pen testing tools for over 20 years.
- We'll focus on Network Services Pen Testing, rather than Host pen testing
- Include IPv4 and IPv6 pen testing, and why it is important to do IPv6 testing, even if you don't think you have IPv6 on your network
- Discuss the balancing act between perfect security, but very inconvenient, and lax security, but very convenient for the user
THC
The Hacker's Choice (THC) has been a useful tool set for creating robust devices on the network for many years. I first used it in my Employment at Ciena over a decade ago. We were introducing IPv6 into our product line, and I wanted to ensure there weren't any obvious vulnerabilities.
The set of tools I was and will be using in this session is called thc-ipv6. I thought there was a IPv4 version of these tools, but I am unable to find them. But even if you don't have IPv6 configured on your network, thc-ipv6 is a good set of tools to see if:
- You are ready for IPv6 deployment
- There isn't others who are taking advantage of you not implementing IPv6 (e.g. running a rouge RA server)
IPv4 tools
There is another tool, yersinia, which will do IPv4 and L2 pen testing. It is in the Debian/Ubuntu/Linux Mint repos.
Getting/Installing the tools
THC-IPv6 must be downloaded from github, and must be compiled on your machine. Before compiling, a few libraries need to be installed.
For Debian/Ubunut/Kali/Backtrack, you can install them by:
$ sudo apt-get install libpcap-dev libssl-dev
For Alpine Linux systems, use the following command:
sudo apk add libpcap-dev openssl1.1-compat-dev
Then to compile the THC tools:
cd thc-ipv6

make
make install
You don't actually need to install them, as you can run them from the compiled directory.
Since yersinia is in the repo, it is simple to install
sudo apt install yersinia
Yersinia Layer 2 attacks
Yersinia has several Layer 2 attacks. Spanning Tree (STP) are particularly nasty, but most home network don't bother running STP, which prevents loops in a L2 network.
It can also be a rouge DHCP server, and set traffic flow up, so Man in the Middle (MITM) attacks can be run.
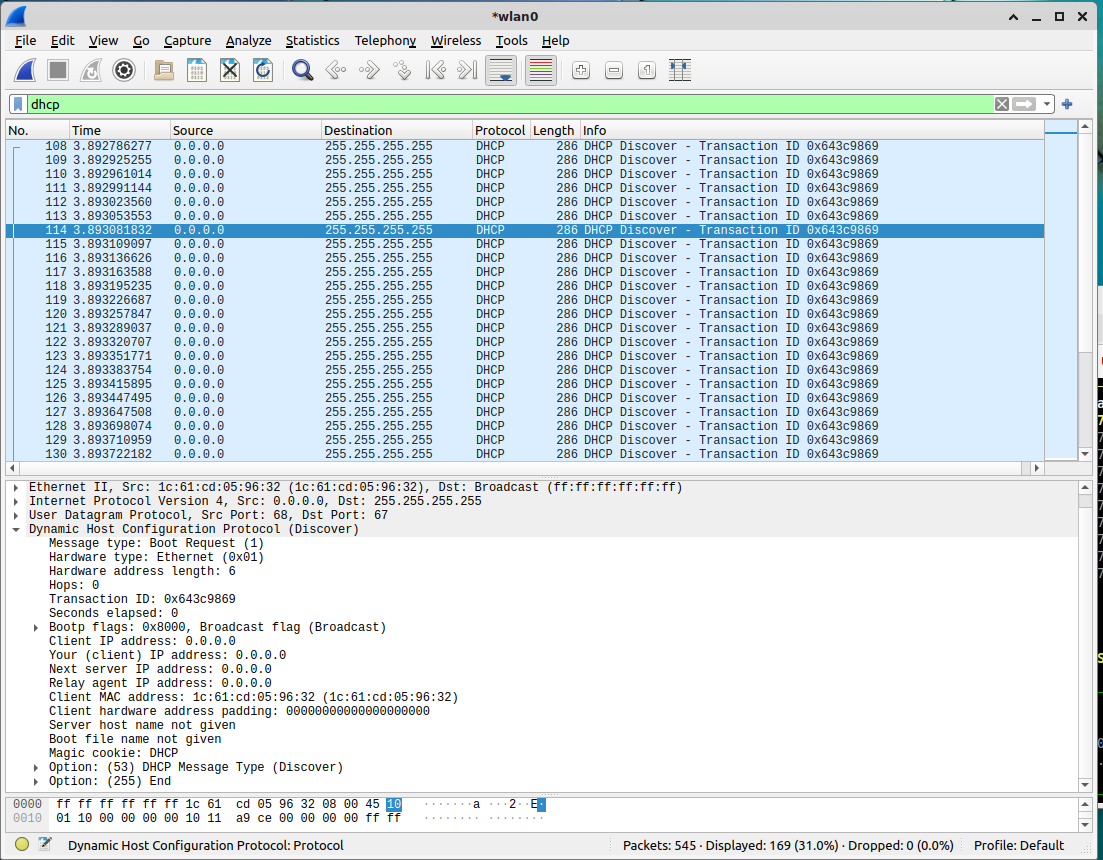
IPv4 DHCP Exhaustion
But this is an session is focused on attacks on network services, and DHCP is a network service. Yersinia can make multiple DHCP requests and exhaust your IPv4 address pool, thus denying clients the ability to get an IPv4 address.
This type of attack generally doesn't work in IPv6 because of the sheer scale of the address space (typically a LAN will have a /64, or 2^64 addresses)
A protection for this type of attack, requires an Enterprise level ethernet switch which can limit the number of MAC addresses per port. By only allowing, say 2 MAC addresses per port on a 24 port switch, a maximum of 48 addresses will be given out, all other requests will be stopped at the L2 switch. Unfortunately home routers typically don't this level of control.
1. Hands On - DHCP exhaustion
Pair up into 2 person groups. One will run yersinia, and the other will be off-line (e.g. disconnect from the lab network). After the attack is run, the second person will try to join the lab network:
Attempt/Answer the following:
- Why is this a problem for the second person?
- What IP addresses could the second person obtain after the attack?
- How might a Network Admin recover the network after such an attack?
- Extra Credit: Sniff the network, how many DHCP requests were sent out?
The Hacker's Choice tools
IPv6 is not immune to network service attacks. But somethings can be harder because Stateless Address Auto Config (SLAAC) does not require a network service to obtain an address.
THC is a collection of tools that has been in development for over 20 years. There's many many attacks in this toolbox. If you didn't install the tools, you can still see a list of tools in nroff format using the following command:
nroff -man thc-ipv6.8 | less
We will look at the following tools:
- passive_discovery6 - Passively sniffs the network and dump all client's IPv6 addresses detected. If scriptname is supplied, it is called with the detected IPv6 address as first and the interface as second parameters
- flood_router26 - Flood the local network with router advertisements with more options
- fragmentation6 - Performs fragment firewall and implementation checks, including denial-of-service
- fuzz_dhcps6 - Fuzzes a DHCPv6 server on specified packet types
Passive Discovery6
As we learned in the last session, it is possible to discover IPv6 hosts on the local network with v6disc.sh. But this uses an active method of discovery (by pinging the multicast address of ff02::1).
THC includes a more stealthy method of IPv6 address host detection, by quietly listening to addresses the network.This method is slower than v6disc.sh, since it must wait for a host to talk on the network.
$ sudo ./passive_discovery6 br0
Started IPv6 passive system detection (Press Control-C to end) ...
Detected: fe80::224:a5ff:fef1:fd11
Detected: 2001:db8:cafe:fd00:cfa:aaff:fe7e:2454
Detected: 2001:db8:cafe:fd60:1d45:992e:66ed:f824
Detected: fe80::7683:c2ff:fe61:fd60
Detected: fe80::58ef:68ff:fe0d:51b7
^C
Flood Router26
Although SLAAC doesn't require a server (as DHCP does) to configure an address, it does require a Router Advertisement (RA) to know which prefix (think: subnet) to use when creating a Globally Unique Address (GUA). This introduces an attack vector, by sending fake RAs into the network. Ten years ago, this would crash Windows 10 systems, as the host would keep adding addresses until the system crashed. This may be fixed now. Linux has a default limit of 16 IPv6 addresses that the kernel will add via RAs.
It has been a while since I have run this tool, and I was unable to get it to add bogus IPv6 addresses in my test network.
The industry has a counter measure to this kind of attack, called RA Guard. RA Guard is available on Enterprise level L2 switches, which prevent RAs from being forwarded from non-router attached ports (via configuration). However, there are a few ways to circumvent RA Guard, one is to use a Fragmentation Header which is inserted between the IPv6 header and the RA (ICMPv6) header, preventing the L2 switch from seeing the rouge RAs.
Fragmentation6
This is a firewall check, to verify your external threat surface is as you expect. It requires running the attack on the outside of your firewall, AND running a sniffer on the inside to see what packets leaked past your firewall.
Because of the traffic that may be happening on the inside of your firewall, you will want to restrict your packet capture to the source address of the fragmentation6 host. To determine the IPv6 address that the attacker is using, run tcpdump on the external interface of your firewall without a capture filter:
tcpdump -i eth0 ip6 and host 2001:db8:1381:5f60::19a
tcpdump: verbose output suppressed, use -v[v]... for full protocol decode
listening on eth0, link-type EN10MB (Ethernet), snapshot length 262144 bytes
10:47:42.603121 IP6 2001:db8:1381:5f00:4247:aece:5566:f4e3 > 2001:db8:1381:5f60::19a: ICMP6, echo request, id 64206, seq 47806, length 18
10:47:42.607491 IP6 2001:db8:1381:5f60::19a > 2001:db8:1381:5f00:4247:aece:5566:f4e3: ICMP6, echo reply, id 64206, seq 47806, length 18
^C
2 packets captured
2 packets received by filter
0 packets dropped by kernel
In the above example the source address is 2001:db8:1381:5f00:4247:aece:5566:f4e3
Now point the packet capture to the inside interface using this packet capture filter:
# tcpdump -i br-lan host 2001:db8:1381:5f00:4247:aece:5566:f4e3
Start the test from the attacking host:
sudo ./fragmentation6 br0 2001:db8:1381:5f60::19a
Run a sniffer behind the firewall to see what passes through

ATTACK initialisation
  Sending ping to 2001:db8:1381:5f60::19a
ATTACK Firewall 1 - resending fragments with different data within stream (2nd real)
  Sending first fragment
  Sending second fragment with fake data and ttl=1
  Sending duplicate second fragment with real data and ttl=64
  Sending third and final fragment
ATTACK Firewall 2 - resending fragments with different data within stream (1st real, 2nd ttl 1)
  Sending first fragment
  Sending duplicate second fragment with real data and ttl=64
  Sending second fragment with fake data and ttl=1
  Sending third and final fragment
...
ATTACK Implementation 14 - sending 65495 bytes in 54 fragments
  Sending 54 fragments ping
Warning: checksums for packets > 65535 are unreliable due implementation differences on target platforms
ATTACK Implementation 15 - sending 65535 bytes in 54 fragments
  Sending 54 fragments ping
Warning: checksums for packets > 65535 are unreliable due implementation differences on target platforms
ATTACK Implementation 16 - sending 66920 bytes in 47 fragments
  Sending 47 fragments ping
Warning: checksums for packets > 65535 are unreliable due implementation differences on target platforms
ATTACK Implementation 17 - replacing fragments with new, different data
  Sending first fragment
  Sending second fragment with fake data
  Sending duplicate second fragment with real data and ttl=64
  Sending third and final fragment
...
ATTACK DOS 33 - last fragment at 8191 + 1414 bytes
  Sending first fragment
  Sending fragments 2-46
  Sending fragment 47 (preparation fragment)
  Sending final fragment with 8191 and sending 1414 bytes
ATTACK finalisation
  Sending final ping to 2001:db8:1381:5f60::19a
ATTACK END
Check the sniffer on the inside of your network, and you should see no packets if your firewall is doing its job
# tcpdump -i br-lan host 2001:db8:1381:5f00:4247:aece:5566:f4e3
tcpdump: verbose output suppressed, use -v[v]... for full protocol decode
listening on br-lan, link-type EN10MB (Ethernet), snapshot length 262144 bytes
10:48:41.259543 IP6 2001:db8:1381:5f00:4247:aece:5566:f4e3 > 2001:db8:1381:5f60::19a: ICMP6, echo request, id 64206, seq 47806, length 18
10:48:41.261568 IP6 2001:db8:1381:5f60::19a > 2001:db8:1381:5f00:4247:aece:5566:f4e3: ICMP6, echo reply, id 64206, seq 47806, length 18
...
10:49:03.268307 IP6 2001:db8:1381:5f00:4247:aece:5566:f4e3 > 2001:db8:1381:5f60::19a: ICMP6, echo request, id 64206, seq 47816, length 1208
10:49:03.271512 IP6 2001:db8:1381:5f60::19a > 2001:db8:1381:5f00:4247:aece:5566:f4e3: ICMP6, echo reply, id 64206, seq 47816, length 1208
10:49:06.271971 IP6 2001:db8:1381:5f00:4247:aece:5566:f4e3 > 2001:db8:1381:5f60::19a: frag (0|1232) ICMP6, echo request, id 64206, seq 47819, length 1232
10:49:06.272011 IP6 2001:db8:1381:5f00:4247:aece:5566:f4e3 > 2001:db8:1381:5f60::19a: frag (1232|1232)
10:49:06.272033 IP6 2001:db8:1381:5f00:4247:aece:5566:f4e3 > 2001:db8:1381:5f60::19a: frag (2464|1232)
10:49:06.272054 IP6 2001:db8:1381:5f00:4247:aece:5566:f4e3 > 2001:db8:1381:5f60::19a: frag (3696|1232)
10:49:06.272100 IP6 2001:db8:1381:5f00:4247:aece:5566:f4e3 > 2001:db8:1381:5f60::19a: frag (4928|1232)
10:49:06.272128 IP6 2001:db8:1381:5f00:4247:aece:5566:f4e3 > 2001:db8:1381:5f60::19a: frag (6160|1232)
10:49:06.272149 IP6 2001:db8:1381:5f00:4247:aece:5566:f4e3 > 2001:db8:1381:5f60::19a: frag (7392|1232)
...
10:49:15.279296 IP6 2001:db8:1381:5f00:4247:aece:5566:f4e3 > 2001:db8:1381:5f60::19a: ICMP6, echo request, id 64206, seq 47806, length 1208
10:49:15.281924 IP6 2001:db8:1381:5f60::19a > 2001:db8:1381:5f00:4247:aece:5566:f4e3: ICMP6, echo reply, id 64206, seq 47806, length 1208
10:49:48.296196 IP6 2001:db8:1381:5f00:4247:aece:5566:f4e3 > 2001:db8:1381:5f60::19a: ICMP6, echo request, id 64206, seq 47806, length 18
10:49:48.298397 IP6 2001:db8:1381:5f60::19a > 2001:db8:1381:5f00:4247:aece:5566:f4e3: ICMP6, echo reply, id 64206, seq 47806, length 18
^C
220 packets captured
220 packets received by filter
0 packets dropped by kernel
Initially it was a concern seeing many fragmented packets come through the firewall, but by default OpenWrt allows ICMP packets (rate limited) through the firewall. These leaked packets corresponded to very large ICMPv6 requests (pings) in Tests 14, 15, and 16, which are large ICMPv6 requests.
Another item regarding this test, use GUAs. Initially, I used ULAs, as that is how I manage my network when my ISP can change my prefix at any time. ULAs will (even large ICMPv6 packets) will not make it through the default firewall of OpenWrt.
fuzz_dhcps6
Another attack surface is your DHCPv6 server. This is tested from inside the network. This test is a stress test on your DHCPv6 server, and will it crash when flooded with many many DHCPv6 Solicit requests.
Run the test from a host in the inside of your network. The defaults are fine to use.
$ sudo ./fuzz_dhcps6 wlan0
Fuzzing packet, starting at fuzz case 0, ending at fuzz case 1999999999:
fuzzbuf(125): ..................................................................WWWWWWWDWWWWWDDDWWDDDWWDDFW............WWWWWWXXXXXXXX
XXXXXX
[] pos[66]=W -> 1 | pkt[66] | 0 (0=>1999999999)|
[] pos[66]=W -> 2 | pkt[66] | 1 (0=>1999999999)|
[] pos[66]=W -> 3 | pkt[66] | 2 (0=>1999999999)|
[] pos[66]=W -> 4 | pkt[66] | 3 (0=>1999999999)|
[] pos[66]=W -> 5 | pkt[66] | 4 (0=>1999999999)|
[] pos[66]=W -> 6 | pkt[66] | 5 (0=>1999999999)|
...
[] pos[124]=X -> 250 | pkt[174] | 6280 (0=>1999999999)|
[] pos[124]=X -> 251 | pkt[174] | 6281 (0=>1999999999)|
[] pos[124]=X -> 252 | pkt[174] | 6282 (0=>1999999999)|
[] pos[124]=X -> 253 | pkt[174] | 6283 (0=>1999999999)|
[] pos[124]=X -> 254 | pkt[174] | 6284 (0=>1999999999)|
[] pos[124]=X -> 255 | pkt[174] | 6285 (0=>1999999999)|
[] pos[124]=X -> 256 | pkt[174] | 6286 (0=>1999999999)|
[] pos[125]= -> 0 | pkt[175] | 6287 (0=>1999999999)|

$ echo $?
0
Check your DHCPv6 server, if it is still running, great!
To see what the test is actually doing to the target, I sniffed the wire:
# tcpdump -i br-lan -c 500 port 546
tcpdump: verbose output suppressed, use -v[v]... for full protocol decode
listening on br-lan, link-type EN10MB (Ethernet), snapshot length 262144 bytes
11:18:36.547316 IP6 fe80::2808:e3e7:7a65:22e2.546 > ff02::1:2.547: dhcp6 solicit
11:18:36.547635 IP6 fe80::2808:e3e7:7a65:22e2.546 > ff02::1:2.547: dhcp6 solicit
11:18:36.547824 IP6 fe80::2808:e3e7:7a65:22e2.546 > ff02::1:2.547: dhcp6 solicit
11:18:36.547972 IP6 fe80::7683:c2ff:fe4c:fd60.547 > fe80::2808:e3e7:7a65:22e2.546: dhcp6 advertise
11:18:36.548357 IP6 fe80::2808:e3e7:7a65:22e2.546 > ff02::1:2.547: dhcp6 solicit
11:18:36.548659 IP6 fe80::2808:e3e7:7a65:22e2.546 > ff02::1:2.547: dhcp6 solicit
11:18:36.549099 IP6 fe80::7683:c2ff:fe4c:fd60.547 > fe80::2808:e3e7:7a65:22e2.546: dhcp6 advertise
11:18:36.550049 IP6 fe80::2808:e3e7:7a65:22e2.546 > ff02::1:2.547: dhcp6 solicit
11:18:36.550058 IP6 fe80::7683:c2ff:fe4c:fd60.547 > fe80::2808:e3e7:7a65:22e2.546: dhcp6 advertise
11:18:36.550178 IP6 fe80::2808:e3e7:7a65:22e2.546 > ff02::1:2.547: dhcp6 solicit
11:18:36.550254 IP6 fe80::2808:e3e7:7a65:22e2.546 > ff02::1:2.547: dhcp6 solicit
...
As you can see it is sending many more solicits than the DHCPv6 server can reply (the advertise). However, this test (using the defaults) is different from the yersinia DHCP Exhaustion test we did in IPv4. Because fuzz_dhcps6 only sends solicits, it does not actually complete the DHCPv6 request, and the server does not give out addresses. This test is more of an exhaustion of memory in the DHCPv6 server, as it tries to allocate memory to handle the solicits.
2. Hands On - IPv6 Pen Testing
Pair up again in twos. One person will run passive_discovery6 while the other stresses the DHCPv6 server with fuzz_dhcps6, use the -F -p 1 options with the fuzz_dhcps6 test.
Attempt/Answer the following:
- How many IPv6 hosts are on the network?
- How many minutes did it take to run fuzz_dhcps6?
- Did the fuzz_dhcps6 test pass or fail?
- By using the
-Ffuzz_dhcps6 is supposed to spoof link-local addresses, why aren't they shown in the passive_discovery6 output? - Extra Credit: How does fuzz_dhcps6 know the address of the DHCPv6 server?
Other tips and tricks
THC has an excellent tips and tricks cheat sheet, which includes such topics as:
- bash
- ssh
- network
- reverse shell
- back doors
- host recon
- and more
Many of the tricks are one or just a few lines of bash script. Well worth looking through.
Conclusion
The subject of Penetration Testing is vast. We have only scratched the surface in this session, discussing both IPv4 and IPv6 network services which can be attacked. It is important to know how the protocols work, and why certain services are vulnerable to attacks.
The important first step is to start thinking about security.
Notes:
11 March 2024