Saving the Meraki MX65 from eWaste with OpenWrt
|
by Craig Miller
This all started when I asked a friend to recommend a managed gigabit ethernet switch. Of course, I wanted to manage it over IPv6. Alas, I could not find any of the manufacturers who would include IPv6 management in their specifications. My friend said, "Why not use an OpenWrt router as a managed switch? It has good IPv6 support." But I wanted more than the typical five ports on an OpenWrt supported home router. Then he suggested the MX65.
Fortunately, the good developer folks at OpenWrt.org have figured out how to install Open Source routing software creating a nice home router with lots of ports.
Update: The MX65 is now supported by OpenWrt 24.10.1 (see notes at the bottom of this article)
What is the MX65?
Meraki is a Cisco Router subsidiary company, which focuses on cloud management of network devices. It is actually a good idea, allowing Enterprises to manage many devices with a few clicks on a cloud-hosted webpage. Unfortunately, like many cloud services, when the cloud disappears, the product becomes unusable. In the case of Meraki, they hasten this process by licensing (think: subscription) the cloud service. Once the license expires (or is not renewed), the product becomes a brick.
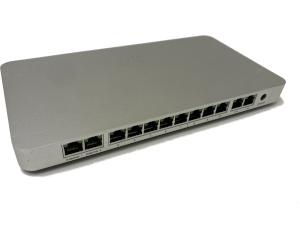
Meraki has many cloud-managed switches in their product line up, the MX65 is a slick looking 12 port (GigE) router. It has a Broadcom Northstar Plus SoC with dual core ARMv7 32 bit CPU, with 1 GB of flash, and 2 GB of RAM, making it a pretty formidable home router.
Where to get one?
eBay is a good start. They can be had for as little as $35 USD. Unclaimed means it is no longer tied to the original owner's cloud-management system. However, it is still possible to install OpenWrt on a claimed MX65, and it may even be cheaper. I recommend you get a power supply (54 VDC at 1.67 Amps) as well.
How to get into the Diag Telnet Server
Fortunately, the MX65 does not require opening the case, or soldering to UART pins to gain access to a root shell on the switch. It does require an ethernet connection, and a pin to press the reset button. From the OpenWrt install instructions:
- On the device, boot into diagnostic mode by holding reset when powering on the device. Continue to hold reset until the orange LED begins to flash white. On used units the white flash may be difficult to see.
- Plug an Ethernet cable into the first LAN port, set the host to 192.168.1.2 and confirm telnet connectivity to 192.168.1.1
I didn't read the instructions very well, and I had plugged my ethernet cable into port 1 (which is a WAN port) and I was still able to telnet to 192.168.1.1 and gain root access to the MX65.
Welcome to the Diagnostic telnet interface on the MX65.
A note about OpenWrt support for Routers
I would say there are four levels of support which range from no support to fully supported:
| Support? | Release |
|---|---|
| No support | Device is not supported by OpenWrt |
| Very Early Support | None, typically an image one builds themselves |
| Early Support | Images built by OpenWrt as SNAPSHOTS |
| Release Support | Images built by OpenWrt and in the release schedule |
OpenWrt for the MX65 is (as of this update) in Release Support. I had the advantage that a friend could build me the uboot, initramfs, and sysupgrade images, and some packages for that image.
Getting images for the MX65
If you don't have a nice friend to build you images, you can use the ones I used.
- uboot_mx65
- openwrt-bcm53xx-generic-meraki_mx65-initramfs.bin
- openwrt-bcm53xx-generic-meraki_mx65-squashfs.sysupgrade.bin
The advantage of using the above images is that LuCI is statically built into the sysupgrade image.
Flashing a new uboot on the MX65
The next step in installing OpenWrt on the MX65 is to flash a uboot image onto the device. This is not reversible, so be sure you want to continue. Again from the install instructions:
-
Prepare a USB drive formatted to FAT. Download uboot_mx65 to the USB drive from the following location: https://github.com/clayface/U-boot-MX64-20190430_MX65 (or use the uboot image from above)
-
Once you have telnet access (above) to the MX65, plug in the USB stick and run the following commands. This is the most dangerous step so please ensure the dd command is entered correctly:
cd /tmp/media/sda1dd if=uboot_mx65 of=/dev/mtdblock0 -
Once this has successfully completed, power off the device.
Booting OpenWrt initramfs on the MX65
Now that you have flashed the uboot onto the device, it is time to boot a minimal version of OpenWrt (which runs completely in RAM).
- Download and place the initramfs image onto the USB drive (the same you used for uboot is OK)
- With the USB drive already inserted, power on the device while holding the reset button. A different white/orange flashing pattern will occur shortly after power on. Let go of the reset button. The device is now booting into OpenWrt initramfs stored on the USB drive.
-
Again, using your laptop statically set to 192.168.1.2/24, ensure Ethernet is plugged into a LAN port (port 3) and use SCP to copy the sysupgrade file to root@192.168.1.1:/tmp, eg:
scp -O openwrt-bcm53xx-generic-meraki_mx65-squashfs.sysupgrade.bin root@192.168.1.1:/tmp -
Before you do the syspupgrade, you may want to clear some space off the flash, this will give you a larger overlay partition
- Connect by SSH to
root@192.168.1.1(there is no password)
[optional]
Modern Linux (including OpenWrt uses Unsorted Block Images (UBI). More info on UBI from kernel.org From ssh login, to see the UBI volumes already in use on the MX65 use the command:
$ ls -d /sys/devices/virtual/ubi/ubi0/ubi0_*
/sys/devices/virtual/ubi/ubi0/ubi0_5  /sys/devices/virtual/ubi/ubi0/ubi0_2  /sys/devices/virtual/ubi/ubi0/ubi0_4
/sys/devices/virtual/ubi/ubi0/ubi0_1  /sys/devices/virtual/ubi/ubi0/ubi0_3

$ cat /sys/devices/virtual/ubi/ubi0/ubi0_*/name
part.safe
board-config
storage
diagnostic1
port.old
To be absolutely sure, which UBI volume is which issue the following commands individually:
root@OpenWrt:~# cat /sys/devices/virtual/ubi/ubi0/ubi0_1/name
part.safe
root@OpenWrt:~# cat /sys/devices/virtual/ubi/ubi0/ubi0_2/name
board-config
root@OpenWrt:~# cat /sys/devices/virtual/ubi/ubi0/ubi0_3/name
storage
root@OpenWrt:~# cat /sys/devices/virtual/ubi/ubi0/ubi0_4/name
diagnostic1
root@OpenWrt:~# cat /sys/devices/virtual/ubi/ubi0/ubi0_5/name
part.old
DO NOT DELETE board-config (in this case ubi0_2)
To delete an unneeded UBI volumes, use the following command:
# to delete part-safe
ubirmvol /dev/ubi0 -n 1
Repeat with the other 3 unneeded UBIVols, substituting their associated numbers at the end of the command.
By deleting uneeded UBIVols, you should have 900-1000 MB of flash storage available for OpenWrt's overlay partition.
Installing OpenWrt on the MX65
Regardless of you chose to make more space by deleting the unneeded UBIVols or not, you are ready to install OpenWrt on the device:
-
(Re)Connect by SSH to
root@192.168.1.1and run sysupgrade (this takes a couple of minutes):sysupgrade /tmp/openwrt-bcm53xx-generic-meraki_mx65-squashfs.sysupgrade.bin -
OpenWrt should now be installed on the device. Cycle power to the MX65 to reboot into OpenWrt
- The front LED should now blink/solid orange while booting, and then go green showing that OpenWrt is running.
- Reconnect by SSH to
root@192.168.1.1 - If you used my images, you should also be able to point your browser to OpenWrt's web interface (LuCI)
http://192.168.1.1
Congratulations, you now have a 12 port OpenWrt router, and have helped save the planet by eliminating one more piece of eWaste!
A bit more info on the MX65
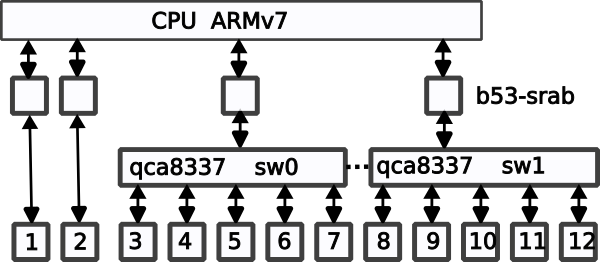
Although the MX65 has all those glorious ports, not all are created equal. By default OpenWrt will create two (2) software bridges, br-wan for the two WAN ports, and br-lan for the ten (10) LAN ports. But there is more happening under the covers. The CPU has 4 GigE connections (b53-srab) on the System on Chip (SoC). These connect to the ports either directly, or via internal HW ethernet switches:
Using all those ports as an IPv6 managed switch
I have connected the MX65 to my house network, with the MX65 WAN port connected to my internal LAN. While configuring the MX65, I have grabbed the WAN IPv6 address and entered it into my DNS (I am big on DNS). I have added a firewall rule to /etc/config/firewall to allow remote management from the WAN port.
config rule
    option dest_port '22 80 443'
    option src 'wan'
    option name 'ext_mgmt'
    option family 'ipv6'
    option target 'ACCEPT'
    list proto 'tcp'
Append the above to your /etc/config/firewall file, and restart the firewall.
fw4 reload
This allows me to reconfigure the LAN ports without danger of getting disconnected.
Setting up VLAN ports on the MX65 with OpenWrt
In order to use the switch ports as managed switch, I removed the last 5 ports (8-12) from br-lan
Using LuCI Web Interface: Network->Interfaces->Devices Tab. Uncheck ports 8-12.

In /etc/config/network the following stanza should read:
config device
    option name 'br-lan'
    option type 'bridge'
    list ports 'lan3'
    list ports 'lan4'
    list ports 'lan5'
    list ports 'lan6'
    list ports 'lan7'
In the LuCI Web Interface: Network->Interfaces->Devices Tab, click on the green [Add device configuration] at the bottom, and add ports to a new device called br-lan2. I also changed the MAC address to avoid confusing other switches in my network.

Once the ports have been assigned go to the Bridge Vlan Filtering tab, and enable VLAN filtering, and add a new VLAN (I chose 10, the range is from 1-4095)
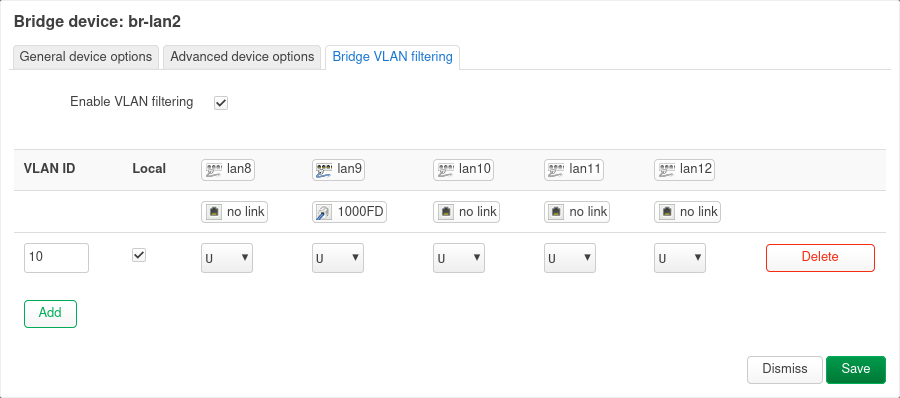
In /etc/config/network you should see last 5 ports (connected to sw1) to VLAN 10,
config device
    option type 'bridge'
    option name 'br-lan2'
    option macaddr 'E0:55:3D:6D:15:9E'
    option mtu '1500'
    option ipv6 '1'
    list ports 'lan8'
    list ports 'lan9'
    list ports 'lan10'
    list ports 'lan11'
    list ports 'lan12'

config bridge-vlan
    option device 'br-lan2'
    option vlan '10'
    list ports 'lan8'
    list ports 'lan9'
    list ports 'lan10'
    list ports 'lan11'
    list ports 'lan12'

config interface 'br2'
    option proto 'none'
    option device 'br-lan2'
The MX65 switch should have Layer 2 (ethernet) connectivity between ports 8-12. But it didn't! I tried several different configuration settings, and finally created an unmanaged L3 interface in LuCI: Network->Interfaces->Add, which I called br2
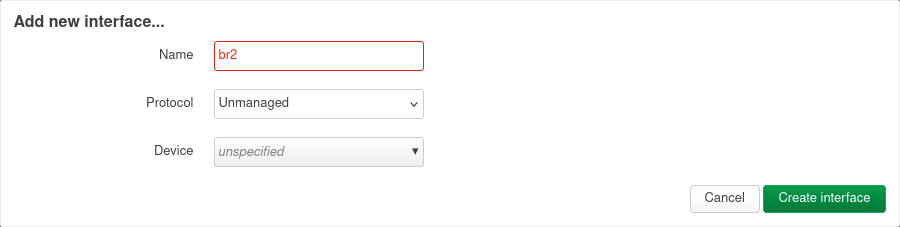
After rebooting the MX65, ports 8-12 were now working as expected (as an isolated L2 switch). I suspect that the OpenWrt code won't initialize L2-only configured items, but rather goes through the list of L3 interfaces, initializing the L2 below each.
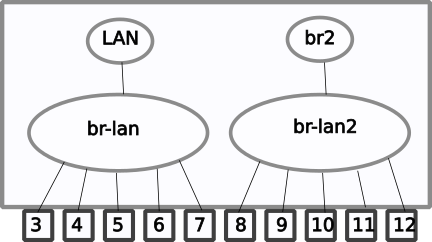
Logical diagram of the MX65 as a Managed Switch
Testing VLAN Tagging performance
Since the MX65 only has a dual core ARMv7l processor, I was concerned that the operation of adding a VLAN tag to the ethernet frame might load down the CPU. So I ran a performance test just using scp a 900MB file from one host to another, each reading/writing to a RAM disk.
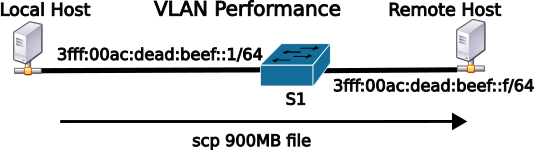
While monitoring the CPU while doing the large transfer, I was pleasantly surprised that the CPU was not busy, and the VLAN tagging operation was happening in the internal switch HW (SW1). I basically was getting near line rate (1 GigE) throughput.
upload:     measured (with scp) 85.7 MB/s (about 850 Mbit) of routing (with 900MB file)
download:   measured (with scp) 93.6 MB/s (about 900 Mbit) of routing (with 900MB file)
Testing the MX65 routing performance
But the MX65 can be used also as a router, and I wanted to see how the dual-core ARMv7l CPU would do with routing, since there is no HW offload for IPv6. I set up two hosts on different networks, and did several transfers of a large file (900MB). Both the local host, and the remote host have 1 GigE Ethernet interfaces, and each of the hosts were reading/writing to RAM disks.
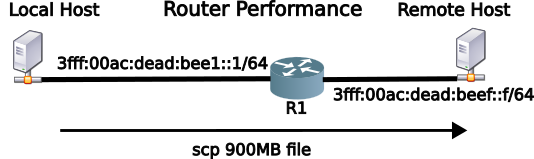
upload:     measured (with scp) 79.7 MB/s (about 800 Mbit) of routing (with 900MB file)
download:   measured (with scp) 61.2 MB/s (about 600 Mbit) of routing (with 900MB file)
I can't explain why the difference between upload (LAN to WAN) is faster than download (WAN to LAN), since there is no NAT involved in IPv6, but the difference was quite repeatable.
Summary
OpenWrt support for the MX65 is still on the bleeding edge. I wouldn't recommend making it the primary router (connected to your ISP), as I am sure more updates are coming.
However, if you are looking for an inexpensive router with a lot more ports than a standard home router, or just an IPv6 managed switch, and you want to help save the planet, I can recommend the Meraki MX65 running OpenWrt.
Notes:
- Installing OpenWrt image on the MX65 (kind of long, read the comments before starting)
- As of this writing, the modified code has been accepted by the OpenWrt devs, and a SNAPSHOT image will be coming in the future.
- While
scpgives nice transfer metrics, it isn't the best for performance testing, as the encryption/decryption take some host time which can be mitigated with faster hosts. But in routing performance testing,scpwill send large packets (near MTU size), where smaller packets (generally minimum size, 56 bytes for IPv4, 80 bytes for IPv6) are a better test for routing performance, since the route engine (on MX65, the CPU) has to do more work per second. Unfortunately, I don't have an Adtech or Smartbits packet generator on hand. - RFC 9637: Expanding the IPv6 Documentation Space
- UPDATE: the MX65 is now supported by OpenWrt 24.10.0. Recommend following the OpenWrt installation directions (above), and then using LuCI to upgrade to 24.10.0 as usual (download image here).
24 September 2024
Updated: 20 February 2025
Updated: 24 May 2025