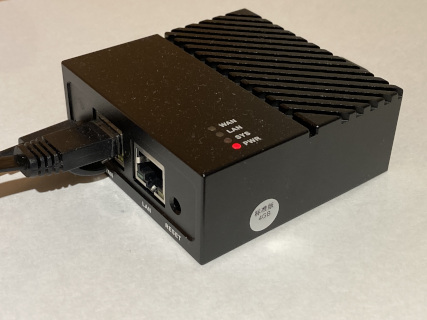
NanoPi Router & NAS
|
by Craig Miller
The NanoPi is an open source dream router. Friendly Electric (the manufacturer) has a port of OpenWrt that runs on it, and if you don't like that one, you can run vanilla OpenWrt. It only has 2 GigE ports (WAN and LAN). It also has two (2) USB ports, which support wireless dongles, making it a wireless router as well. It has excellent performance, with 970 Mbits/sec of routing power. My highest performing router in my stable.
For more of the basics of the NanoPi , including hardware, and where to get software, refer to Introducing the NanoPi presentation.
Using the Pi as a Router
The NanoPi has excellent HW support for being a router. It has two (2) 1 Gigbit Ethernet interfaces, which can run line rate. It has a quad-core ARM processor which can process (think: route) packets and line rate. And it runs FriendlyWRT or OpenWRT, the open source routing software.
But how does the NanoPi get Addresses to route?
Routing Basics
In order for a router to route packets (either IPv4 or IPv6), there needs to be a difference in the subnets/prefixes between interfaces. For example the following will NOT work.

How is the LAN interface get an address
It depends.
IPv4
The most common method for a LAN interface is to statically assign one, and let Network Address Translation (NAT is evil) handle the routing. But this requires the user to change the configuration of their router, since more than likely, the upstream router has a subnet of 192.168.0.0/24 (or 192.168.1.0/24).
Of course, one doesn't have to run NAT. One could disable NAT and route packets the old fashioned way, by inserting static routes, or run a routing protocol like RIPv2. But all of this also requires configuration from the user.
IPv6
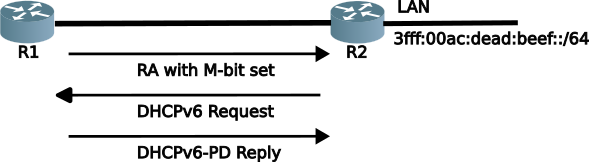
One of the improvements over the legacy protocol, is to include a more automagic method of getting prefix assigned to the LAN. Using the IPv6 flavour of DHCP, called DHCPv6, option 25 or OPTION_IA_PD (see RFC 8415) to convey the LAN prefix to be used.
A sample wireshark capture of a DHCPv6-PD transaction.
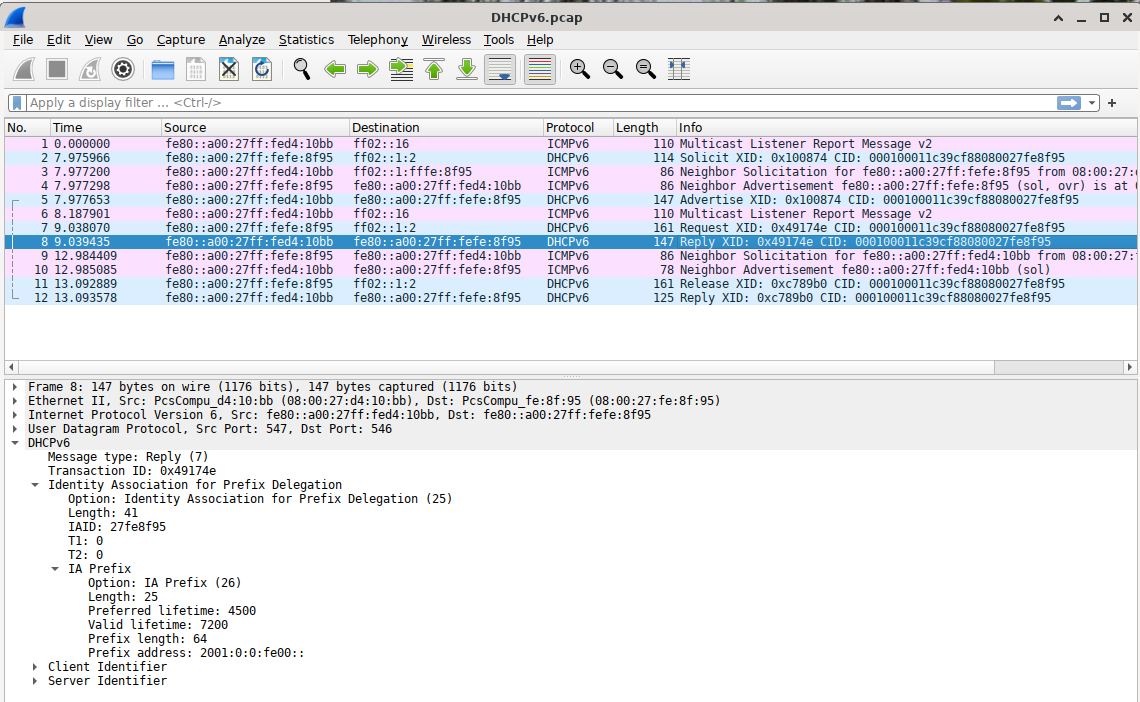
Note the Prefix Delegated address is 2001:0:0:fe00::/64
1. Hands On - Sniffing DHCPv6-PD
Using the Wireshark remote capture method, capture the DHCPv6-PD transaction and:
Attempt/Answer the following:
- What is the IP address of the router handing out the Prefix Delegation?
- What Prefix Delegation (PD) address did you receive?
- Why didn't everyone get the same PD address?
- Extra Credit: What prefixes does you laptop now have?
Using the NanoPi as a NAS
Since the NanoPI has two (2) USB 3.0 ports, not only is it possible to install a Wifi dongle to make it a Wifi router, but it is also possible to connect a Solid State Drive (SSD), for Network Attached Storage (NAS) functionality. I would not recommend configuring your main router (connected to your ISP and the Internet) as a NAS, but certainly it makes sense for an router connected to your internal LAN.
Connecting your SSD
I selected one of my unused SSDs as a test NAS drive. Initially it would not mount. I had to mount it manually with the following command (after logging in with ssh):
# mount /dev/sda2 /mnt
# df -h
Filesystem      Size  Used Avail Use% Mounted on
tmpfs           512K     0  512K   0% /dev
tmpfs           384M  128K  384M   1% /run
overlay          28G  3.2G   24G  12% /
tmpfs           1.9G   22M  1.9G   2% /tmp
/dev/sda2       879G  505M  834G   1% /mnt
Setting up a Samba Share (SMB)
One should also configure the mounting of your hard drive via the LuCI web interface, so that it will mount after a reboot. Using LuCI -> System -> Mount Points

Setting up a Samba Share (SMB)
Now that you have your external HD mounted, it is time to share it with Samba. Use LuCI -> Services -> Network Shares
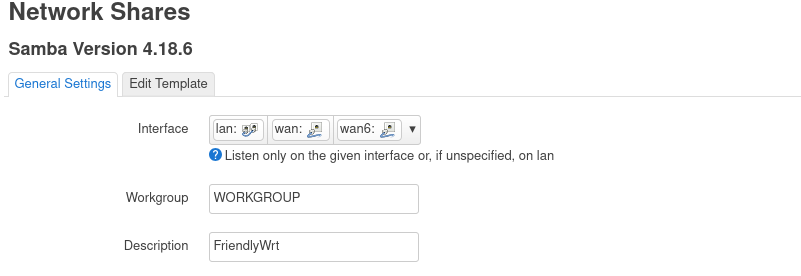
Press Add, and fill in the Shared Directory info, including a user (which will be added later)
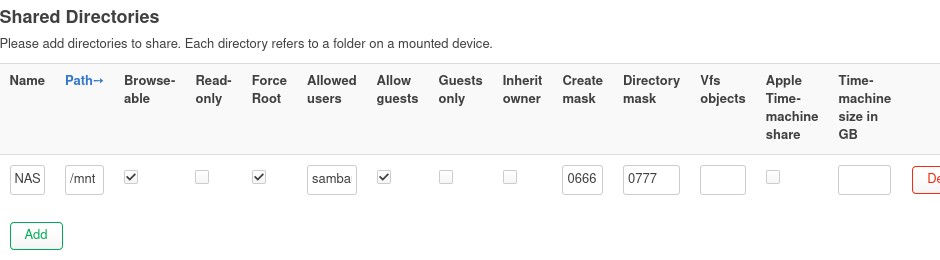
Although the config alludes that a guest user can log into a Samba Share, I was not able to get this working, so I created a user 'sambau' One can follow the simple steps by vantc.net
Essentially, one needs to ssh into the NanoPi, and do the following:
- Use an editor to add the user to /etc/passwd file
- Add
sambau:*:1000:65534:sambau:/var:/bin/false
- Add
- Create a password for the user using
smbpasswdsmbpasswd -a sambau
- Ensure your mount point is world accessible
chmod -R 777 /mnt/chown -R nobody /mnt
Connecting to the Samba Server with Linux
Most will connect to the Samba server from Windows, but you can also connect from Linux using the mount command. Of course, it is easier to connect to the shared drive via sshfs from Linux, but both Macs and Windows can connect via SMB (Samba).
On your Linux machine issue the following command, where the name of the NanoPi is 6waimea (the uid is that of your linux user, often it will be 1000):
# SD is the directory to mount the Samba Shared Drive
$ sudo mount -o uid=1000  -t cifs -o user=sambau  //6waimea/NAS SD
Password for sambau@//6waimea/NAS:
Or if you plan on doing this regularly, and you don't want to enter a password all the time, you can setup a .credentials file with the password embedded. Using a text editor create the following file:
username=sambau
password=mypassword
domain=WORKGROUP
Then use the following command to use the .credentials file
sudo mount -o uid=1000 -t cifs -o credentials=~/.credentials //6waimea/NAS SD
NAS summary
I would not suggest using your primary router as a NAS, but if it is located in another part of your internal network, why not. But this not the fancy RAID/ZFS kind of NAS. It is just a shared drive. If you need a fancy NAS, I recommend a dedicated machine (NanoPi running Ubuntu), or even a commercial NAS product.
The NanoPi, a small powerful little machine
The NanoPi with 4 GB of RAM and 32 GB of storage, make not only a high performance Gigabit router, but also a basic Network Attached Storage. All at under $100 USD (amazon.com)
Next month, we'll talk about expanding the LAN port with VLANs
Notes:
- IPv6 documentation prefixes are 2001:db8::/32 & 3fff::/20
- see all the DHCPv6 Options
- Connecting to Samba server with Linux https://vantc.net/setup-file-sharing-smb-on-openwrt-with-samba4.html
- Configuring Samba on OpenWrt Wiki
17 Sept 2024