Blinking a Light from a Linux Container on the Pi

|
by Craig Miller
In 2010, the Raspberry Pi began as a teaching device in the UK. Since then, hobbyists all over the world, have embraced the little SBC (Single Board Computer) to control the world. From measuring temperatures, and pond flow rates, turning on and off lights, to even creating a smart home.
Not only is the Raspberry Pi a SBC a general purpose computer, but it also has a HW (Hardware) interface via 40 GPIO (General Purpose Input/Output) pins. The pins are software selectable as input or output. Software running on the Pi can sense items in the real world, and can react and control it as well.
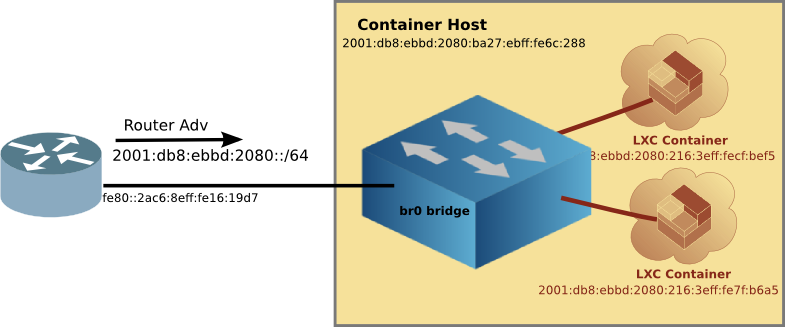
Linux Containers (LXD) is a method of segregating software into containers, each with its own IP address (IPv6 & IPv4) and disk space. With the release of the latest version of Raspian Buster LXD is now supported via a technology called snap.
LXD Containers are great for not only isolating software, but also the dependencies such as libraries. And once the applications and libraries are all setup in a Container, it is easy to create backups of the container, copy the container to other Pi's running LXD, or even create a template image to create many many containers with your application and libraries.
Why access GPIO from inside a Container?
There are advantages to running a simple task inside container. The task is smaller, easier to create, and debug. Linux Containers allows for easy snapshots (backups) of the container. One can even migrate a task-oriented container to another host with a single command.
This architecture allows one to build simple automated tasks which have no dependency on each other. For example, in three containers, one could run:
- Backyard pond control: measures water level, adds water when needed, monitors water temperature, etc
- In house light control: Turning on/off lights per time, or after sensing activity via an IR sensor
- Temperature control: Sensing temperature, and controlling the home HVAC (Heating Ventilation, Air Conditioning) system, creating a smart thermostat
Each task has access to GPIO creating controlling and sensing GPIO pins as needed, but otherwise running independently of each other. Should a new feature be added to the light control Container, there is no danger that the other Containers will be impacted. The house will remain warm in the winter, and cool in the summer.
Installing LXD on Raspian Buster
One only need follow the instructions on the Raspberry Pi website to get your Pi running Raspian Buster.
Once the Pi is booted install snapd using apt-get, and use snap to install LXD.
sudo apt-get install snapd  bridge-utils
sudo snapd install core lxd
Add yourself to the lxd group so you won't have to type sudo all the time.
sudo usermod -aG lxd craig
newgrp lxd
Then run lxd init to initialize the Linux Containers daemon. If you are unsure, just take all the defaults.
Create your first container with the following command:
lxc launch images:alpine/3.10 gpio-container
This will pull down the version 3.10 of Alpine and run it in a container on the Raspberry Pi.
To setup networking for your LXD containers, you will want to follow the steps of creating a linux bridge (a virtual ethernet switch) on the Pi, creating a virtual network inside the Pi.
Accessing GPIO
Now that Linux Containers (LXD) is installed on the Pi, and the network has been created, the next step is to allow containers access to the Raspberry Pi GPIO pins.
A little history
The Raspberry Pi was created as a teaching device. Something that would be used as a stand alone SBC, and therefore security was not on the top of mind.
An architectural decision was made to allow direct access to the Pi's memory (RAM). Older linux kernels supported this capability, so it made sense at the time. However, in modern times, direct access to memory, means that encryption keys, and other important secrets can be read directly out of memory. The Linux kernel development team has migrated away from direct memory access.
However, by the time this was done, the Raspberry Pi had already created a body of software that utilized direct memory access. Mostly notably the Python libraries which enable access to the GPIO require direct memory access.
LXD and GPIO
The purpose of LXD is to create isolated environments which do not have access to the Container Host or other Linux Containers running on the host. This includes no direct memory access.
In order to use GPIO from a Linux Container, the inherent security of LXD must be weakened. The first step is to make the Container privileged, and add /dev/mem as a device inside the container (named gpio-container).
lxc config set gpio-container security.privileged true
lxc config device add gpio-container devmem unix-char source=/dev/mem
lxc config set gpio-container raw.lxc 'lxc.cap.drop='
lxc restart gpio-container
The last lxc config set gpio-container raw.lxc 'lxc.cap.drop=' command directs LXD to not drop direct access the host memory. Finally, restart the container.
To test that the container does have direct memory access, use hexdump to read a chunk of memory. Step into the running container with lxc exec command, and run the following hexdump command:
lxc exec gpio-container sh
hexdump -n 10 /dev/mem
The hexdump output should show a small snippet of memory, rather than errors:
 # hexdump -n 10 /dev/mem
0000000 0008 ea00 f800 0124 1131
000000a
 #
Configuring Python in your Container
Now that the container can directly access memory, it would be good to access the GPIO pins from Python. Step into the running container:
lxc exec gpio-container sh
From inside the container install the following:
# add GPIO package (which also installs python3)
apk add py3-rpigpio

# link python3 to python
ln -s /usr/bin/python3 /usr/bin/python
Create a little python script to toggle GPIO pin 40 (which if you have a LED connected will blink the LED on and off. Copy and paste the following into a file inside the container. Name the file blink.py
#! /usr/bin/python

# Blink a LED
# Import the libraries we need
import RPi.GPIO as GPIO
import time

# Set the pin mode to board pin numbering
GPIO.setmode(GPIO.BOARD)
pin = 40

# Set the pin to be an output
GPIO.setup(pin, GPIO.OUT)

i=0

# Loop turning it on and off
while i < 5:
    GPIO.output(pin, 1)
    time.sleep(1)
    GPIO.output(pin, 0)
    time.sleep(1)
    i = i + 1

# Set the pins back to default
GPIO.cleanup()
Now run the python script with the following:
python blink.py
After about 5 seconds, the python script should exit with out any errors.
Blinking an LED
Connecting a LED to the Pi, only requires a LED and a 470 ohm resister. I chose to use pin 40 and 39 (ground) (these pins are closest to the USB ports). The schematic for the circuit is quite simple:
        470 ohms
    +--/\/\/\------+ pin 40
    |
    |        ,
    +------->|-----+ pin 39 (ground)
     (long) LED (short)
The LED will have one lead longer than the other. The shorter lead should be connected to ground (pin 39).
Now run blink.py again, and you can sit back and bask in the glow of your flashing LED.
Control the world
The Raspberry Pi is a useful little SBC with GPIO pins that allow controlling and sensing real-world devices. Paired with Linux Containers, many separate tasks can be run on a single Pi, each controlling part of your world.
- flashing LED by Batsocks
16 November 2019