Introducing the NanoPi
|
by Craig Miller
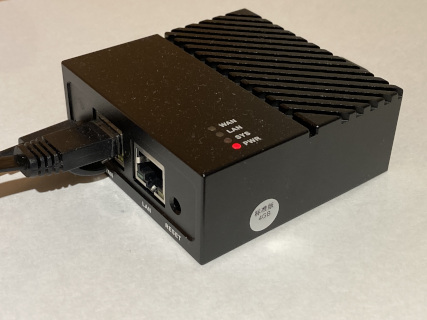
The NanoPi is an open source dream router. Friendly Electric (the manufacturer) has a port of OpenWrt that runs on it, and if you don't like that one, you can run vanilla OpenWrt on it. It only has 2 GigE ports (WAN and LAN). It also has two (2) USB ports, which support wireless dongles, making it a wireless router as well. It has excellent performance, with 970 Mbits/sec of routing power. My highest performing router in my stable.
Hardware
As mentioned there are two GigE ports and two USB3 ports, as well as a six core ARM CPU. From the Wiki Page:
- SoC: Rockchip RK3399
- CPU: big.LITTLE?Dual-Core Cortex-A72(up to 2.0GHz) + Quad-Core Cortex-A53(up to 1.5GHz)
- GPU: Mali-T864 GPU?supports OpenGL ES1.1/2.0/3.0/3.1, OpenCL, DX11, and AFBC
- VPU: 4K VP9 and 4K 10bits H265/H264 60fps decoding, Dual VOP, etc
- RAM: 1GB DDR3/4GB LPDDR4
- Ethernet: one Native Gigabit Ethernet, and one PCIe Gigabit Ethernet
- USB: two USB 3.0 Type-A ports
- microSD Slot x 1
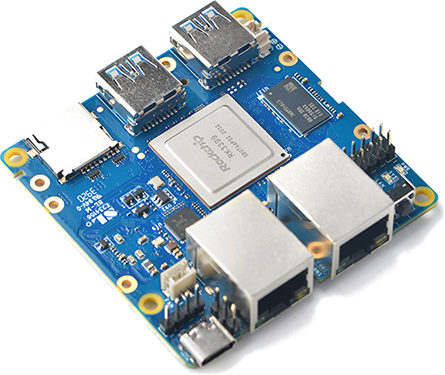
The base unit is $50 USD. I bought the 4GB RAM (additional $15) version with the solid aluminum case (additional $10) from Friendly Electric.
Picking an Image to boot
The Nano Pi has an SD card slot, and Friendly Electric has several images available to turn the small ARM processor-based box into a high performance router (running OpenWrt), or just a headless server running Debian or Ubuntu.
Booting the NanoPI
Once the image has been burned to an SD card, just insert it into the NanoPi and boot. However, because it is headless (no HDMI port) one will need to figure out the IP address and ssh to the NanoPi.
Running OpenWrt
When running OpenWrt, it is easy to determine the IP address, just plug into the LAN port, and ssh to the .1 or ::1 address of the subnet/prefix of your laptop. For example, if your computer's IP address is: 2001:db8:cafe:5f60:ad77:51b7:d4db:a3e3 then the router's IP address would be 2001:db8:cafe:5f60::1.
Just like any unconfigured OpenWrt router, there will be no password, and one should set a password as soon as possible. By default, OpenWrt has firewall rules which prevent ssh from connecting on the WAN port. Therefore this isn't as insecure as it sounds.
Running FriendlyWRT
Of course, one can run the vanilla OpenWrt (23.05.3), but there are advantages to running FriendlyWRT, Friendly Electric's prebuilt version of OpenWrt.
FriendlyWRT has several OpenWrt packages which I have never bothered to install, because I didn't have enough storage or RAM in my other routers. But with a 32 GB SD card, and 4 GB of RAM, I now had plenty of space.
Additional packages included in FriendlyWRT
Some of the additional pre-install packages include:
| Package | Description |
|---|---|
| adblock | Blocks ads |
| block-mount | Mounting USB drives |
| collectd | Collects stats (more later) |
| coreutils | Full versions of utils rather than busybox |
| dockerd | Docker (more later) |
| iperf3 | Measuring TCP and UDP bandwidth |
| Kernel Manager | Manages kernel parameters |
| Netlink Bandwidth Monitor | Draws nice graphs of BW usage |
| Network Shares | Windows file sharing |
| SmartDNS | A high performance DNS server |
| ttyd | A web-based terminal server |
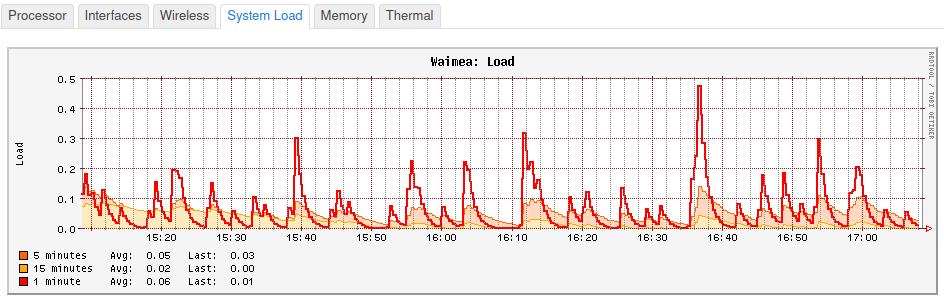
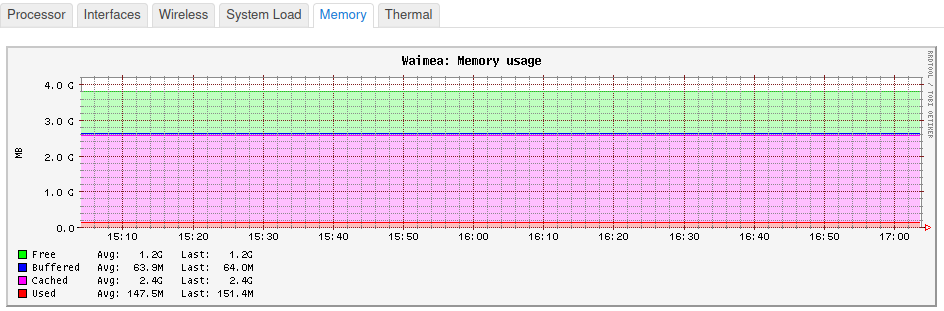
Collectd Stats Package
Although the package itself doesn't take much storage, the data it collects does. The NanoPI with 32 GB of storage is perfect for giving it a try. There is nice integration with LuCI (the web interface of OpenWrt), where nice graphs of processor, interface, system load, memory, and thermal temperatures.
Docker Package
In order to run Docker, it is easiest to start with the version of FriendlyWRT with Docker pre-installed.
There is nice LuCI integration as well as running Docker CLI commands.
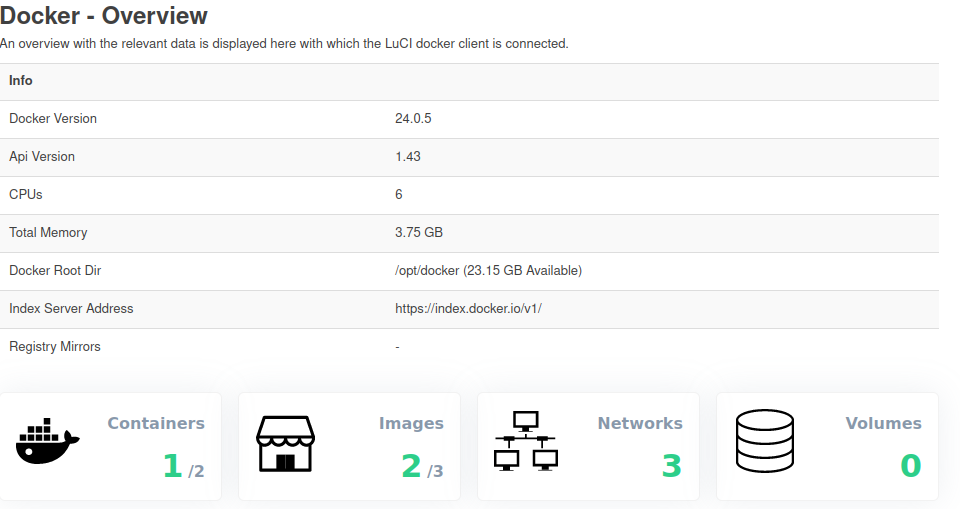
I find it easiest to start a docker container with the CLI, as I want to bind the container to an IPv6 (as described in the IPv6 Advantage). For example, starting a container called whoami binding to an address that was created for this container.
docker run -d -p [2001:db8:cafe:fd60::25]:8080:80 containous/whoami
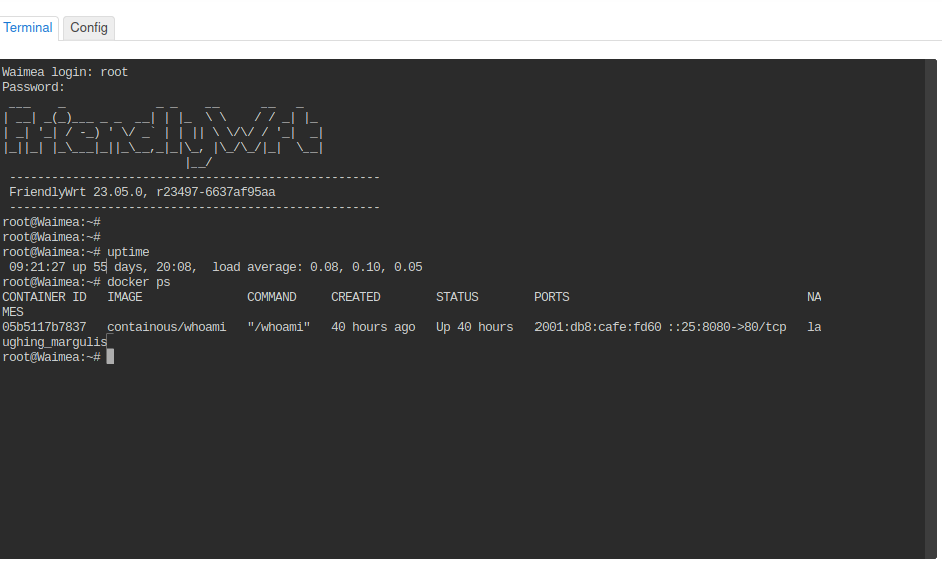
In LuCI, the web interface of OpenWrt, we see the new container running:

And putting that address into the browser shows this output:
Hostname: 05b5117b7837
IP: 127.0.0.1
IP: 172.17.0.2
RemoteAddr: 172.17.0.1:54162
GET / HTTP/1.1
Host: [2001:db8:cafe:fd60::25]:8080
User-Agent: Mozilla/5.0 (X11; Linux x86_64; rv:125.0) Gecko/20100101 Firefox/125.0
Accept: text/html,application/xhtml+xml,application/xml;q=0.9,image/avif,image/webp,*/*;q=0.8
Accept-Encoding: gzip, deflate
Accept-Language: en-US,en;q=0.5
Connection: keep-alive
Dnt: 1
Sec-Gpc: 1
Upgrade-Insecure-Requests: 1
Because the container is using the default Docker bridge the IPv4 address is still showing a 172.17.0.2 address.
Of course, I don't recommend typing bare IPv6 addresses, but rather use the power of DNS, and a three line script to create your container (assuming your DNS name is web2):
    export HOST="web2"
    export IPADDR=$(host $HOST | awk '{print $5}')
    docker run -d -p "[$IPADDR]:80:80" containous/whoami
TTYd Package
The ttyd package makes it possible to log into the router's command line via the LuCI web page.
Unfortunately, one has to enable listening on IPv6, which is turned off by default. At least there is support for IPv6.
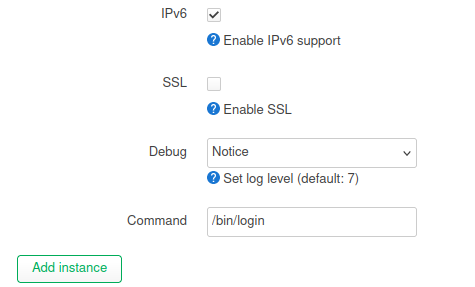
As you can see, there is also an enable SSL option (should be TLS) as well. This would make the connection secure, but adding a signed CA certificate and key, may be challenging. It may be easier to just use ssh.
The NanoPi, a small powerful little machine
The NanoPi with 4 GB of RAM and 32 GB of storage, make not only a high performance Gigabit router, but also plenty room to run resource intensive packages, such as collectd and Docker. All at under $100 USD (amazon.com)
Notes:
29 June 2024